| HTML |
|---|
<div class="aui-tabs horizontal-tabs" id="tabs-example1" style="margin-bottom: 10px;"> <ul class="tabs-menu" style="border-bottom: 1px solid #ccc;"> <li class="menu-item active-tab"> <a href="https://qnetconfluence.cms.gov/display/HCD/HCD+Process%3A+Initiate" style="padding-top: 8px;"><img class="confluence-embedded-image confluence-thumbnail" src="/download/thumbnails/39065078/icon-initiate-sm.png?version=2&modificationDate=1546531039245&api=v2" data-image-src="/download/attachments/39065078/icon-initiate-sm.png?version=2&modificationDate=1546531039245&api=v2" data-unresolved-comment-count="0" data-linked-resource-id="39066369" data-linked-resource-version="2" data-linked-resource-type="attachment" data-linked-resource-default-alias="icon-initiate-sm.png" data-base-url="https://qnetconfluence.cms.gov" data-linked-resource-content-type="image/png" data-linked-resource-container-id="39065078" data-linked-resource-container-version="16" title="Human-Centered Design > HCD Process: Initiate > icon-initiate-sm.png" data-location="Human-Centered Design > HCD Process: Initiate > icon-initiate-sm.png" data-image-height="42" data-image-width="42" style="" thumbnail="true" border="0" width="21"> <strong style="position: relative;top: -5px;">INITIATE</strong></a> </li> <li class="menu-item"> <a href="https://qnetconfluence.cms.gov/display/HCD/HCD+Process%3A+Immerse" style="padding-top: 8px;"><img width="21" data-linked-resource-default-alias="icon-immerse-sm.png" data-linked-resource-container-version="17" class="confluence-embedded-image confluence-thumbnail" data-location="Human-Centered Design > HCD Process: Initiate > icon-immerse-sm.png" data-linked-resource-id="39066367" src="/download/thumbnails/39065078/icon-immerse-sm.png?version=2&modificationDate=1546531038920&api=v2" data-linked-resource-version="2" data-linked-resource-type="attachment" data-unresolved-comment-count="0" data-linked-resource-content-type="image/png" title="Human-Centered Design > HCD Process: Initiate > icon-immerse-sm.png" data-base-url="https://qnetconfluence.cms.gov" data-image-width="42" data-image-src="/download/attachments/39065078/icon-immerse-sm.png?version=2&modificationDate=1546531038920&api=v2" data-image-height="42"> <strong style="position: relative;top: -5px;">IMMERSE</strong></a> </li> <li class="menu-item"> <a href="https://qnetconfluence.cms.gov/display/HCD/HCD+Process%3A+Synthesize" style="padding-top: 8px;"><img class="confluence-embedded-image confluence-thumbnail" width="21" src="/download/thumbnails/39065078/icon-synthesize-sm.png?version=2&modificationDate=1546531038551&api=v2" data-image-src="/download/attachments/39065078/icon-synthesize-sm.png?version=2&modificationDate=1546531038551&api=v2" data-unresolved-comment-count="0" data-linked-resource-id="39066371" data-linked-resource-version="2" data-linked-resource-type="attachment" data-linked-resource-default-alias="icon-synthesize-sm.png" data-base-url="https://qnetconfluence.cms.gov" data-linked-resource-content-type="image/png" data-linked-resource-container-id="39065078" data-linked-resource-container-version="19"> <strong style="position: relative;top: -5px;">SYNTHESIZE</strong></a> </li> <li class="menu-item"> <a href="https://qnetconfluence.cms.gov/display/HCD/HCD+Process%3A+Ideate" style="padding-top: 8px;"><img class="confluence-embedded-image confluence-thumbnail" width="21" src="/download/thumbnails/39065078/icon-ideate-sm.png?version=2&modificationDate=1546531038216&api=v2" data-image-src="/download/attachments/39065078/icon-ideate-sm.png?version=2&modificationDate=1546531038216&api=v2" data-unresolved-comment-count="0" data-linked-resource-id="39066366" data-linked-resource-version="2" data-linked-resource-type="attachment" data-linked-resource-default-alias="icon-ideate-sm.png" data-base-url="https://qnetconfluence.cms.gov" data-linked-resource-content-type="image/png" data-linked-resource-container-id="39065078" data-linked-resource-container-version="20"> <strong style="position: relative;top: -5px;">IDEATE</strong></a> </li> <li class="menu-item"> <a href="https://qnetconfluence.cms.gov/display/HCD/HCD+Process%3A+Prototype" style="padding-top: 8px;"><img class="confluence-embedded-image confluence-thumbnail" width="21" src="/download/thumbnails/39065078/icon-prototype-sm.png?version=2&modificationDate=1546531037901&api=v2" data-image-src="/download/attachments/39065078/icon-prototype-sm.png?version=2&modificationDate=1546531037901&api=v2" data-unresolved-comment-count="0" data-linked-resource-id="39066370" data-linked-resource-version="2" data-linked-resource-type="attachment" data-linked-resource-default-alias="icon-prototype-sm.png" data-base-url="https://qnetconfluence.cms.gov" data-linked-resource-content-type="image/png" data-linked-resource-container-id="39065078" data-linked-resource-container-version="21"> <strong style="position: relative;top: -5px;">PROTOTYPE</strong></a> </li> <li class="menu-item"> <a href="https://qnetconfluence.cms.gov/display/HCD/HCD+Process%3A+Implement" style="padding-top: 8px;"><img class="confluence-embedded-image confluence-thumbnail" width="21" src="/download/thumbnails/39065078/icon-implement-sm.png?version=2&modificationDate=1546531037583&api=v2" data-image-src="/download/attachments/39065078/icon-implement-sm.png?version=2&modificationDate=1546531037583&api=v2" data-unresolved-comment-count="0" data-linked-resource-id="39066368" data-linked-resource-version="2" data-linked-resource-type="attachment" data-linked-resource-default-alias="icon-implement-sm.png" data-base-url="https://qnetconfluence.cms.gov" data-linked-resource-content-type="image/png" data-linked-resource-container-id="39065078" data-linked-resource-container-version="22"> <strong style="position: relative;top: -5px;">IMPLEMENT</strong></a> </li> </ul> </div> |
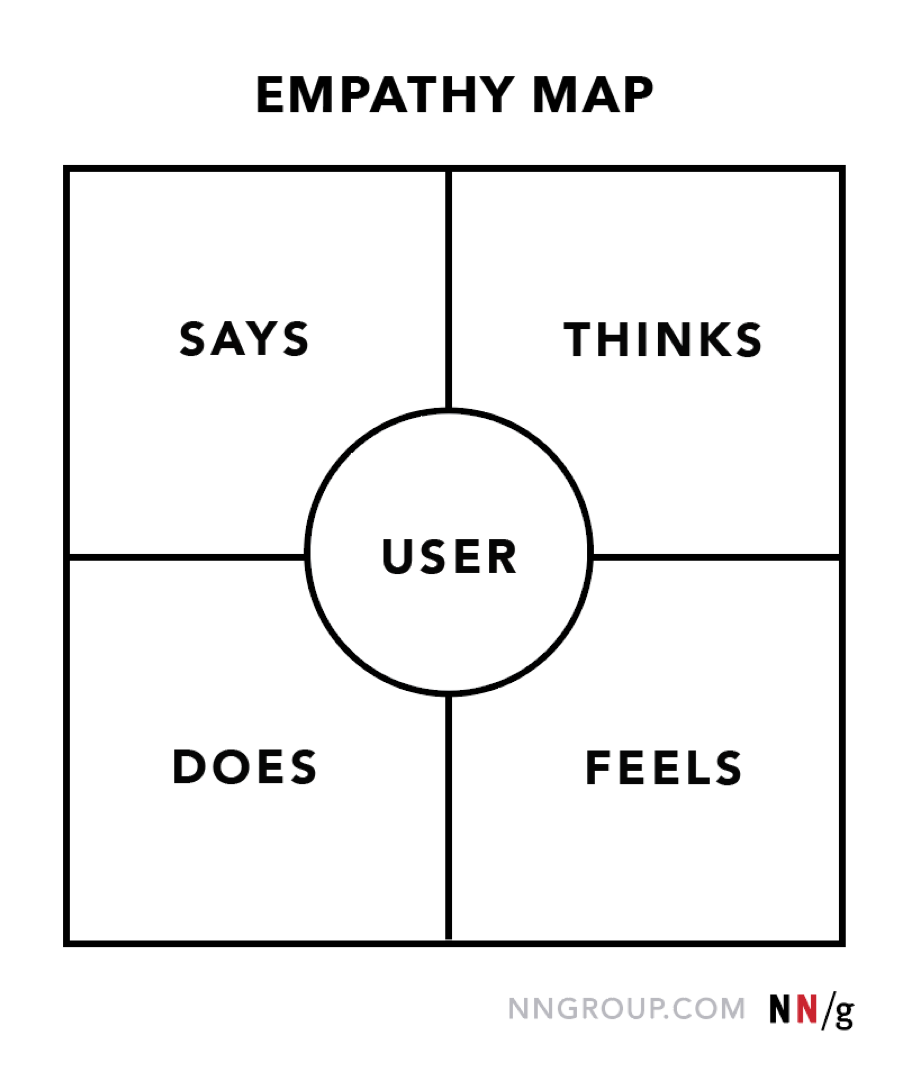
What is an Empathy Map?
Empathy maps helps design teams to understand the user’s mindset by capturing what a persona says during an interview or other usability study, thinks throughout the experience, the actions the user physically does, and the user’s feelings during the activity, in order to prioritize the user’s needs. Empathy maps are also great as a background for the construction of the personas that you would often want to create later. Empathy maps consist of four main areas. Each area represents important characteristics which the user exhibited during the observation or research phase. Each area of the map will show what the user says, thinks, feels and does.
"An empathy map is a very quick, very rough persona template"
Why Use Empathy Maps
Empathy maps should be used throughout any UX process to establish common ground among team members and to understand and prioritize user needs. In user-centered design, empathy maps are best used from the very beginning of the design process.
Both the process of making an empathy map and the finished artifact have important benefits for the organization:
- Capture who a user or persona is
The empathy-mapping process helps distill and categorize your knowledge of the user into one place. It can be used to:
a. Categorize and make sense of qualitative research (research notes, survey answers, user-interview transcripts)
b. Discover gaps in your current knowledge and identify the types of research needed to address it. A sparse empathy map indicates that more research needs to be done.
c. Create personas by aligning and grouping empathy maps covering individual users
- Communicate a user or persona to others
An empathy map is a quick, digestible way to illustrate user attitudes and behaviors. Once created, it should act as a source of truth throughout a project and protect it from bias or unfounded assumptions.
Be sure to keep empathy maps ‘alive’ by revising and adjusting them as you do more research. Collect data directly from the user
When empathy maps are filled in directly by users, they can act as a secondary data source and represent a starting point for a summary of the user session. Moreover, the interviewer may glean feelings and thoughts from the interviewee that otherwise would have remained hidden.
| Section | ||||||||||
|---|---|---|---|---|---|---|---|---|---|---|
|
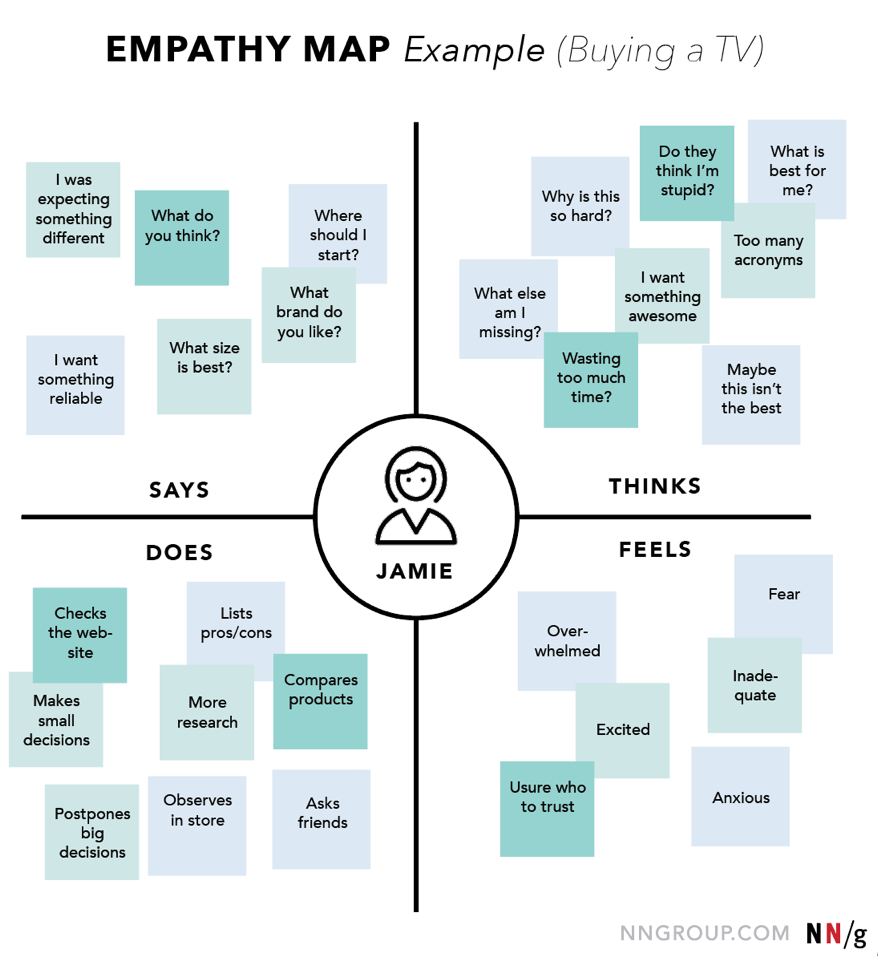
Images from https://www.nngroup.com/articles/empathy-mapping/
Process: How to Build an Empathy Map
Go through the following steps to create a valid and useful empathy map:
1.Define scope and goals
a. What user or persona will you map?
- Will you map a persona or an individual user? Always start with a 1:1 mapping (1 user/persona per empathy map). This means that, if you have multiple personas, there should be an empathy map for each.
b. Define your primary purpose for empathy mapping.
- Is it to align the team on your user? If so, be sure everyone is present during the empathy-mapping activity. Is it to analyze an interview transcript? If so, set a clear scope and timebox your effort to ensure you have time to map multiple user interviews.
- Gather materials
Your purpose should dictate the medium you use to create an empathy map. If you will be working with an entire team, have a large whiteboard, sticky notes, and markers readily available. (The outcome will look somewhat like the illustration above.) If empathy mapping alone, create a system that works for you. The easier to share out with the rest of the team, the better.
Collect research
Gather the research you will be using to fuel your empathy map. Empathy mapping is a qualitative method, so you will need qualitative inputs: user interviews, field studies, diary studies, listening sessions, or qualitative surveys.
Individually generate sticky notes for each quadrant
Once you have research inputs, you can proceed to mapping as a team. In the beginning, everybody should read through the research individually. As each team member digests the data, they can fill out sticky notes that align to the four quadrants. Next, team members can add their notes to the map on the whiteboard.
Converge to cluster and synthesize
In this step, the team moves through the stickies on the board collaboratively and clusters similar notes that belong to the same quadrant. Name your clusters with themes that represent each group (for example, “validation from others” or “research”). Repeat themes in each quadrant if necessary. The activity of clustering facilitates discussion and alignment — the goal being to arrive at a shared understanding of your user by all team members.
Once your empathy map is clustered, you can begin to vocalize and align as a team on your findings. What outliers (or data points that did not fit in any cluster) are there? What themes were repeated in all the quadrants? What themes only exist in one quadrant? What gaps exist in our understanding?
Polish and plan
If you feel that you need more detail or you have unique needs, adapt the map by including additional quadrants (like Goals the example below) or by increasing specificity to existing quadrants. Depending on the purpose of your empathy map, polish and digitize the output accordingly. Be sure to include the user, any outstanding questions, the date and version number. Plan to circle back to the empathy map as more research is gathered or to guide UX decisions.

Microlearning
| Section | |||||||||||||||||||
|---|---|---|---|---|---|---|---|---|---|---|---|---|---|---|---|---|---|---|---|
|
For More Information
- Empathy Mapping: The First Step in Design Thinking (NN/g)
- Gamestorming Toolkit: Empathy Map
- Empathy Map – Why and How to Use It
- How to Run an Empathy & User Journey Mapping Workshop
Process: How to Build an Empathy Map
Go through the following steps to create a valid and useful empathy map:
1. Define scope and goals
a. What user or persona will you map?
Will you map a persona or an individual user? Always start with a 1:1 mapping (1 user/persona per empathy map). This means that, if you have multiple personas, there should be an empathy map for each.
b. Define your primary purpose for empathy mapping.
Is it to align the team on your user? If so, be sure everyone is present during the empathy-mapping activity. Is it to analyze an interview transcript? If so, set a clear scope and timebox your effort to ensure you have time to map multiple user interviews.
2. Gather materials
Your purpose should dictate the medium you use to create an empathy map. If you will be working with an entire team, have a large whiteboard, sticky notes, and markers readily available. (The outcome will look somewhat like the illustration above.) If empathy mapping alone, create a system that works for you. The easier to share out with the rest of the team, the better.
3. Collect research
Gather the research you will be using to fuel your empathy map. Empathy mapping is a qualitative method, so you will need qualitative inputs: user interviews, field studies, diary studies, listening sessions, or qualitative surveys.
4. Individually generate sticky notes for each quadrant
Once you have research inputs, you can proceed to mapping as a team. In the beginning, everybody should read through the research individually. As each team member digests the data, they can fill out sticky notes that align to the four quadrants. Next, team members can add their notes to the map on the whiteboard.
5. Converge to cluster and synthesize
In this step, the team moves through the stickies on the board collaboratively and clusters similar notes that belong to the same quadrant. Name your clusters with themes that represent each group (for example, “validation from others” or “research”). Repeat themes in each quadrant if necessary. The activity of clustering facilitates discussion and alignment — the goal being to arrive at a shared understanding of your user by all team members.
Once your empathy map is clustered, you can begin to vocalize and align as a team on your findings. What outliers (or data points that did not fit in any cluster) are there? What themes were repeated in all the quadrants? What themes only exist in one quadrant? What gaps exist in our understanding?
6. Polish and plan
If you feel that you need more detail or you have unique needs, adapt the map by including additional quadrants (like Goals the example below) or by increasing specificity to existing quadrants. Depending on the purpose of your empathy map, polish and digitize the output accordingly. Be sure to include the user, any outstanding questions, the date and version number. Plan to circle back to the empathy map as more research is gathered or to guide UX decisions.| Section | ||||||||||
|---|---|---|---|---|---|---|---|---|---|---|
|
| Info | ||
|---|---|---|
| ||
|