| Horizontal Navigation Bar Page |
|---|
|
| Section |
|---|
HCQIS Access Roles and Profile (HARP) is a secure identity management portal provided by the Centers for Medicare and Medicaid Services (CMS). Creating an account via HARP provides users with a user ID and password that can be used to sign into many CMS applications. It also provides a single location for users to modify their user profile, change their password, update their challenge question, and add and remove two-factor authentication devices.
| HTML |
|---|
<div style="background-color: #E1F3F8; box-shadow: 0 0 0 5px #fff; padding: 40px 0; width: 25%; display: inline-block; text-align: center;">
<a href="https://qnetconfluence.cms.gov/display/HS/HARP?preview=/66653342/122690239/20201116_HARP-quick-start-guide.pdf"><h1><strong>Quick Start Guide</strong></h1></a>
</div>
<div style="background-color: #E1F3F8; box-shadow: 0 0 0 5px #fff; padding: 40px 0; width: 25%; display: inline-block; text-align: center;">
<a href="https://www.youtube.com/playlist?list=PLaV7m2-zFKphoCXj7sIx2G1fwMZQQ0EJP"target="_blank"><h1><strong>Training Videos</strong></h1></a>
</div>
<div style="background-color: #E1F3F8; box-shadow: 0 0 0 5px #fff; padding: 40px 0; width: 25%; display: inline-block; text-align: center;">
<a href="https://harp.cms.gov/login/help"><h1><strong>HARP Help (FAQ)</strong></h1></a>
</div>
<div style="background-color: #E1F3F8; box-shadow: 0 0 0 5px #fff; padding: 40px 0; width: 25%; display: inline-block; text-align: center;">
<a href="https://harp.cms.gov/login/contact"><h1><strong>Contact Help Desk</strong></h1></a>
</div> |
| Panel |
|---|
| borderColor | #f1f1f1 |
|---|
| titleColor | #000000 |
|---|
| borderWidth | 1 |
|---|
| titleBGColor | #f1f1f1 |
|---|
| borderStyle | solid |
|---|
| title | Notification ListservHARP Email Notifications |
|---|
| To receive notifications with news, release and maintenance information, sign up for the HARP ListServ. Users can be request to be added to our subscriber list by clicking on the link and following the instructions below: ListServ Sign-up
For information regarding HARP releases, upgrades, outages and general announcements
- On the page select the Public Lists tab
- Enter Your Informationyour name and email
- Select the checkbox next to HARP Notify: HCQIS Access Roles and Profile (HARP) Notifications
- Click Submit
For news and information for development teams integrating with HARP - On the page select the Private Lists tab
- Enter Your Informationyour name and email
- Select the checkbox next to HARP IntDev: HCQIS Access Roles and Profile (HARP) Integrated Development Notifications
- Click Submit
|
|
|
| Horizontal Navigation Bar Page |
|---|
| | Excerpt |
|---|
| Section |
|---|
Creating a HARP Account
| Column |
|---|
| Note |
|---|
For security reasons, all users creating a HARP account are required to complete identity proofing to verify their identity. |
| I am a... | HARP signup instructions |
|---|
| CMS employee | Scenario #1 | | CMS contractor with an EIDM and/or EUA account | Scenario #1 | | CMS contractor without an EIDM and/or EUA account | Scenario #2, otherwise go to Scenario #3 | | Provider, vendor, or other |
|
standard | HTML |
|---|
<div style="background-color: #E1F3F8; padding: 20px; margin-top: 40px;">
<h3>Scenario #1: EIDM or EUA</h3>
<p>If you are an existing EIDM or EUA user, you may bypass registration and log into HARP directly with your EIDM or EUA account.</p>
</div> |
Log into HARP using your EIDM or EUA credentials to migrate your EIDM/EUA account to HARP via the steps below. Step 1: Click on the following link: https://harp.cms.gov/ Step 2: Enter your EIDM or EUA User ID and Password. Step 3: Select Login. If you have an EIDM or EUA account, but you experience issues following the above steps, please contact the QualityNet Help Desk at 1-866-288-8912. Note: CMS users must log into HARP using their EUA credentials at least once before the PIV card login feature is activated. If you are having trouble with utilizing PIV to log in, please sign in using EUA first. If you have been using your HARP account rather than your EUA account to log into HARP, then you cannot use PIV card authentication. If you choose to start using your EUA account so you can use PIV card authentication, then you will need to re-request all your user roles. |
anchor | scenario2 | scenario2 | | HTML |
|---|
<div style="background-color: #E1F3F8; padding: 20px; margin-top: 20px;">
<h3>Scenario #2: Remote Identity Proofing</h3>
<p>Your identity is verified remotely via a series of personal questions.</p>
</div> |
| Widget Connector |
|---|
| width | 100% |
|---|
| url | https://www.youtube.com/watch?v=G1zj8JqxWg4&list=PLaV7m2-zFKphoCXj7sIx2G1fwMZQQ0EJP&index=2&t=0s |
|---|
|
Step 1: Click on the following link: https://harp.cms.gov/register HARP will verify your identity through personal information, such as Date of Birth and Social Security Number, which utilizes Experian to generate a list of personal questions that will verify your identity. Step 2: Enter your profile information (please use your corporate email address) and select Next. Because your HARP ID can be used to login to several CMS applications which access sensitive information such as PHI or PII, identity proofing is required. This includes providing your SSN. If you do not wish to provide your SSN, a manual proofing option is available. Manual proofing may, however, delay the process. Step 3: Choose your user ID, password, and challenge question and select Next. Note: You will not be able to change your user ID after registration. Step 4: If remote proofing questions were successfully generated, answer the five identity proofing questions to verify your identity and select Next. If you were unable to generate remote proofing questions OR you answered your remote proofing questions incorrectly, you have two options: - If you think you know what you entered incorrectly, you can retry remote proofing by returning to the Profile Information screen and selecting Retry Remote Proofing. This will pre-populate the fields below.
- Call Experian to verify your identity over the phone and then enter your reference number on the Profile Information screen by selecting Enter Reference Number. This will pre-populate the fields below.
Step 5: Your account has been created and you will receive a confirmation email. Step 6: For security reasons, all HARP accounts are required to have two-factor authentication. Select Login to Complete Setup to log into HARP and set up two-factor authentication. Once you have set up two-factor authentication, feel free to log into your respective CMS application. Follow your application’s instructions for how to request a role. CONGRATULATIONS! You’re done! You are now registered with HARP. If you are unable to successfully complete remote proofing, you will need to initiate manual proofing. | Anchor |
|---|
scenario3 | scenario3 | | HTML |
|---|
<div style="background-color: #E1F3F8; padding: 20px; margin-top: 20px;">
<h3>Scenario #3: Manual Identity Proofing</h3>
<p>Your identity is verified by physically sending identification documents.</p>
</div> |
| Widget Connector |
|---|
| width | 100% |
|---|
| url | http://youtube.com/watch?v=rYioFNNvtD0 |
|---|
|
Step 1: Click on the following link: https://harp.cms.gov/register If you were unable to successfully complete remote proofing or you do not want to enter your full SSN, then you will need to initiate manual proofing. Step 2: Enter your Profile Information and select Initiate Manual Proofing below the SSN field. SSN field is optional if you initiate manual proofing. Step 3: Choose your user ID, password, and challenge question and select Next. Note: You will not be able to change your user ID after registration. Step 4: Send the following documents to your application's help desk via email, fax, or mail - One of three approved forms of Government Photo IDs:
- Current driver’s license issued by state or territory; OR
- Federal or State government issued photo identification card; OR
- U.S. Passport
- Two copies of financial institution official bills or statements addressed to the address used during the registration process. Payroll information is also accepted.
- If you choose not to fill out the HARP SSN field, you will need to provide only the last four digits of your SSN to your application's help desk
Step 5: The help desk will contact you via email if they need to request additional information. When your documents have been verified, you will receive an email confirming your account creation. Step 6: For security reasons, all HARP accounts are required to have two-factor authentication. Select Login to Complete Setup to log into HARP and set up two-factor authentication. Once you have set up two-factor authentication, feel free to log into your respective CMS application. Follow your application’s instructions for how to request a role. CONGRATULATIONS! You’re done! You are now registered with HARP For any questions related to manual proofing, contact the Identity Access Management (IAM) team, Monday-Friday 7am-7pm CST by phone 1-888-599-0426 or email identityproofing@hcqis.org for manual proofing questions. | title | CLICK HERE for reported 403 Error Resolution for EUA HARP Users |
|---|
| EUA users may routinely encounter a 403 App Not Assigned error when logging into some CMS Systems. This issue occurs when logging in using both HARP account credentials and EUA/PIV credentials in the same browser. Workaround: If you encounter a 403 error for this situation, please do the following: - Go to https://idm.cms.gov
- Log out of IDM by clicking on your name in the top right and selecting "Sign out"
- Close your current browser
- Open a new browser and try to log into the desired system
Note: If the issue persists, then you may try clearing your browser's cache or using a different browser. A long-term fix is being reviewed and is currently being piloted. We apologize for the inconvenience. |
| HTML |
|---|
<div style="background-color: #E1F3F8; padding: 20px; margin-top: 20px;">
<h3>Scenario #2: Remote Identity Proofing</h3>
<p>Your identity is verified remotely via verifiable personal information .</p>
</div> |
| Widget Connector |
|---|
| width | 100% |
|---|
| url | https://www.youtube.com/watch?v=G1zj8JqxWg4&list=PLaV7m2-zFKphoCXj7sIx2G1fwMZQQ0EJP&index=2&t=0s |
|---|
|
Step 1: Click on the following link: https://harp.cms.gov/register HARP will verify your identity using personal information such as date of birth, email, and Social Security Number through Experian by cross referencing databases to determine identity legitimacy. Step 2: Enter your profile information (personal and corporate email address) and select Next. Because your HARP ID can be used to login to several CMS applications which access sensitive information such as PHI or PII, identity proofing is required. This includes providing your SSN. If you do not wish to provide your SSN, a manual proofing option is available. Manual proofing may, however, delay the process. Changes to the current Remote Identity Proofing (RIDP) process? In order for the HARP system to remain in compliance with NIST guidelines, a Risk Based Alternative (RBA) solution was developed in coordination with Experian. The traditional Knowledge-Based Authentication (KBA) method that relies on questions, depends on static information, which can be susceptible to theft or exposure. The new RBA method utilized verifiable personal information utilizing various source databases processed through Experian. This solution represents a more refined and secure approach to identity verification. Experian’s RBA solution dynamically evaluates a variety of risk indicators in real-time, utilizing a broad spectrum of data points and sophisticated algorithms to determine identity legitimacy. This approach significantly reduces the potential for fraud, providing a higher level of security for consumers and CMS alike.
What does this mean for you? The new RBA solutions will occur May 23, 2024. Will only apply to new user registrations. A user with an existing application role will not have to Identity Proof again.
What’s different? Credit history will no longer be used. The data elements Users will now provide is Personal Identifiable Information (PII). All information used to verify your identity pertains to you. PII data elements include: - Legal first & last name
- Date of Birth
- Personal email address
- Business email address
- Personal phone number
- Home Address
- Social Security Number
- Updated: Terms and Conditions (added ‘External Service Consent’ section)
Step 3: Choose your user ID, password, and challenge question and select Next. Note: You will not be able to change your user ID after registration. Step 3a: If your profile information fails to verify your identity, you have two options: - If you think you know what you entered incorrectly, you can retry remote proofing by returning to the Profile Information screen and selecting Retry Remote Proofing. Entering the last four digits of your SSN and date of birth or your Reference Number will pre-populate the fields below.
- Call Experian to verify your identity over the phone and then enter your reference number on the Profile Information screen by selecting Enter Reference Number. This will pre-populate the fields below.
Step 4: Your account has been created and you will receive a confirmation email. Step 5: For security reasons, all HARP accounts are required to have two-factor authentication. Select Login to Complete Setup to log into HARP and set up two-factor authentication. Once you have set up two-factor authentication, feel free to log into your respective CMS application. Follow your application’s instructions for how to request a role. CONGRATULATIONS! You’re done! You are now registered with HARP. If you are unable to successfully complete remote proofing, you will need to initiate manual proofing. | HTML |
|---|
<div style="background-color: #E1F3F8; padding: 20px; margin-top: 20px;">
<h3>Scenario #3: Manual Identity Proofing</h3>
<p>Your identity is verified by physically sending identification documents.</p>
</div> |
| Widget Connector |
|---|
| width | 100% |
|---|
| url | http://youtube.com/watch?v=rYioFNNvtD0 |
|---|
|
Step 1: Click on the following link: https://harp.cms.gov/register If you were unable to successfully complete remote proofing or you do not want to enter your full SSN, then you will need to initiate manual proofing. Step 2: Enter your Profile Information and select Initiate Manual Proofing below the SSN field. SSN field is optional if you initiate manual proofing. Step 3: Choose your user ID, password, and challenge question and select Next. Note: You will not be able to change your user ID after registration. Step 4: Send the following documents to your application's help desk via email, fax, or mail - One of three approved forms of Government Photo IDs:
- Current driver’s license issued by state or territory; OR
- Federal or State government issued photo identification card; OR
- U.S. Passport
- Two copies of financial institution official bills or statements addressed to the address used during the registration process. Payroll information is also accepted.
- If you choose not to fill out the HARP SSN field, you will need to provide only the last four digits of your SSN to your application's help desk
Step 5: The help desk will contact you via email if they need to request additional information. When your documents have been verified, you will receive an email confirming your account creation. Step 6: For security reasons, all HARP accounts are required to have two-factor authentication. Select Login to Complete Setup to log into HARP and set up two-factor authentication. Once you have set up two-factor authentication, feel free to log into your respective CMS application. Follow your application’s instructions for how to request a role. CONGRATULATIONS! You’re done! You are now registered with HARP For any questions related to manual proofing, contact the Identity Access Management (IAM) team, Monday-Friday 7am-7pm CST by phone 1-888-599-0426 or email identityproofing@cms.hhs.gov for manual proofing questions. |
|
|
| Horizontal Navigation Bar Page |
|---|
| title | Requesting a User Role |
|---|
|
| Section |
|---|
Requesting a User Role in HARP
| Column |
|---|
| Note |
|---|
Each organization needs to designate at least one Security Official (SO) who will be responsible for approving individuals for access to various programs within their organization. For more information, please see the Security Official tab. |
|
|
| | Horizontal Navigation Bar Page |
|---|
| title | Requesting a User Role |
|---|
| | Section |
|---|
Requesting a User Role in HARP| Column |
|---|
A tutorial video on HARP User Roles is available on YouTube: http://youtube.com/watch?v=FHiHggRLq4o If your application uses HARP for role requests, do the following: Step 1: Log into HARP – you will land on your user dashboard. From there, select User Roles. | Expand |
|---|
| title | View Step One Screenshot |
|---|
|  Image Removed Image Removed
|
Step 2: Select Request a Role. | Expand |
|---|
| title | View Step Two Screenshot |
|---|
| 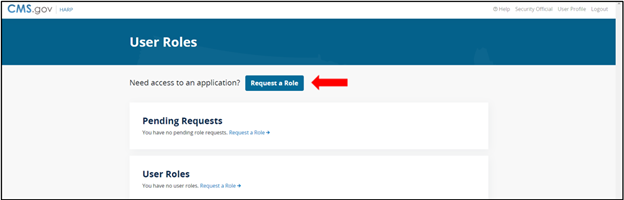 Image Removed Image Removed
|
Step 3: Select the desired Program and select Next. | Expand |
|---|
| title | View Step Three Screenshot |
|---|
| 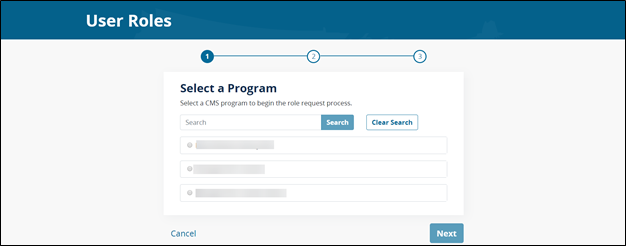 Image Removed Image Removed
|
Step 4: Select your Organization and select Next. | Expand |
|---|
| title | View Step Four Screenshot |
|---|
|  Image Removed Image Removed
|
Step 5: Select the desired User Role and select Submit. | Expand |
|---|
| title | View Step Five Screenshot |
|---|
| 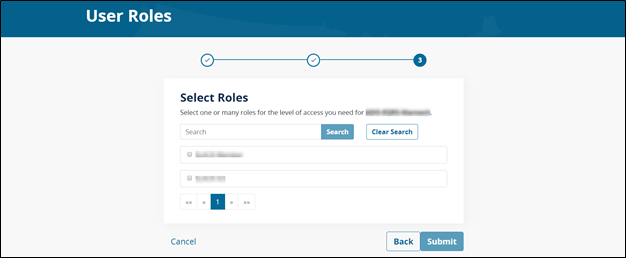 Image Removed Image Removed
|
Step 6: Enter your request reason, including relevant information like your job title, company name, etc. and select Submit. | Expand |
|---|
| title | View Step Six Screenshot |
|---|
| 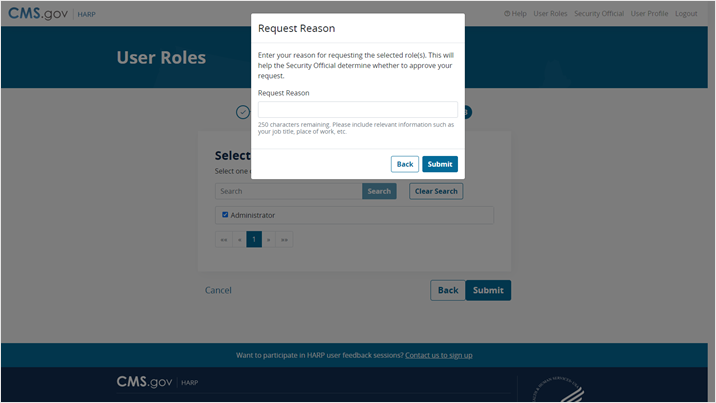 Image Removed Image Removed
|
Step 7: You will be notified via email when your role request has been approved or rejected. | Column |
|---|
| | Panel |
|---|
| | borderColor | #254b78 |
|---|
| titleColor | #ffffff |
|---|
| borderWidth | 1 |
|---|
| titleBGColor | #254b78 |
|---|
| borderStyle | solid |
|---|
| title | Video: HARP User Roles |
|---|
| | Widget Connector |
|---|
| width | 100% |
|---|
url | | https://www.youtube.com/watch?v=FHiHggRLq4o&list=PLaV7m2-zFKphoCXj7sIx2G1fwMZQQ0EJP&index=6 |
|
| height | 100% |
|---|
|
| Note |
|---|
Each organization needs to designate a Security Official (SO) who will be responsible for approving individuals for access to various programs within their organization. For more information, please see the HARP Security Official Role page. |
| Section |
|---|
Need Help?Please contact the Service Center with questions regarding registering or access via email at ServiceCenterSOS@cms.hhs.gov or phone at 1-866-288-8914 (TRS: 711). Please contact the Experian Help Desk for identity proofing questions. The Experian Help Desk is open Monday through Friday from 8:30 a.m. to 10:00 p.m., Saturday from 10:00 a.m. to 8:00 p.m., and Sunday from 11:00 a.m. to 8:00 p.m., Eastern Standard Time. You can contact the Experian Help Desk at (866) 578-5409. The Experian website can be accessed at experian.com. |
If your application uses HARP for role requests, do the following: Step 1: Log into HARP – you will land on your user dashboard. From there, select User Roles. | Expand |
|---|
| title | View Step One Screenshot |
|---|
| Image Added |
Step 2: Select Request a Role. | Expand |
|---|
| title | View Step Two Screenshot |
|---|
| Image Added |
Step 3: Select the desired Program and select Next. | Expand |
|---|
| title | View Step Three Screenshot |
|---|
| Image Added |
Step 4: Select your Organization and select Next. | Expand |
|---|
| title | View Step Four Screenshot |
|---|
| Image Added |
Step 5: Select the desired User Role and select Submit. | Expand |
|---|
| title | View Step Five Screenshot |
|---|
| Image Added |
Step 6: Enter your request reason, including relevant information like your job title, company name, etc. and select Submit. | Expand |
|---|
| title | View Step Six Screenshot |
|---|
| Image Added |
Step 7: You will be notified via email when your role request has been approved or rejected. |
|
|
| Horizontal Navigation Bar Page |
|---|
|
| Section |
|---|
| Column |
|---|
Managing HARP User ID and Password
| Note |
|---|
EUA users cannot reset their password or update their profile information in HARP - they must perform these actions in the EUA system only at eua.cms.gov. |
| Widget Connector |
|---|
| width | 100% |
|---|
| url | http://youtube.com/watch?v=CXt1lEiARAs |
|---|
|
|
|
| | Horizontal Navigation Bar Page |
|---|
| | Section |
|---|
| Column |
|---|
Managing HARP User ID and PasswordA tutorial video on HARP Password Reset is available on YouTube: https://youtu.be/CXt1lEiARAs NOTE: EUA users must perform password reset and update profile information on the EUA System only. Forgot your User IDStep 1: Go to HARP and select Having trouble logging in? Step 2: Select Forgot User ID or Password. Step 3: Enter your email address and select Send Email. Step 4: You will receive an email containing your user ID. You can ignore the Reset Password button if you don’t need to reset your password. Forgot your PasswordStep 1: Go to HARP and select Having trouble logging in? Step 2: Select Forgot User ID or Password. Step 3: Enter your email address and select Send Email. Step 4: You will receive an email containing your user ID and a button to reset your password. Step 5: Select Reset Password (you will be prompted to answer your challenge question). Step 6: Enter your challenge question answer and select Next. If you forgot your challenge question answer, follow the instructions for Forgot your Password and Challenge Question (Full Account Recovery). Step 7: Enter your new password and confirm your new password, then select Reset Password. Step 8: You should now be able to log in with your user ID and new password. Forgot your Password and Challenge Question (Full Account Recovery)Step 1: Go to HARP and select Having trouble logging in? Step 2: Select Full Account Recovery. Step 3: Enter your Email Address, First Name, Last Name, and Date of Birth, and select Send Email. Step 4: You will receive an email that contains your user ID and a button to recover your account. Step 5: Select Recover Account. Step 6: You will be prompted to establish a challenge question and answer. Step 7: Once you have chosen your challenge question and provided an answer, select Reset Challenge Question. Step 8: Enter and confirm your new password and select Reset Password. Step 9: You should now be able to log in with your user ID and new password. Managing HARP User ProfileA tutorial video on the HARP User Profile is available on YouTube: https://youtu.be/2kxiqIp86GU Step 1: Log into HARP – you will land on your User Profile. Step 2: To edit your Profile Information, select the Edit button in the top right. Step 3: Modify your information, such as Email Address, Home Address, etc. Note: You cannot update your First Name, Last Name, or Date of Birth in your User Profile. Call your application’s help desk if you need to update these fields. Step 4: To allow the HARP team to reach out to you for user feedback, select the checkbox to opt into user feedback sessions. Step 5: Select Save to save your changes. Change PasswordStep 1: Log into HARP – you will land on your User Profile. Step 2: To change your password, select Change Password in the left navigation. Step 3: Enter your Old Password, New Password, and Confirm New Password. Step 4: Select Save to change your password. Update Challenge QuestionStep 1: Log into HARP – you will land on your User Profile. Step 2: To update your challenge question, select Challenge Question in the left navigation. Step 3: Enter your Password, select a new Challenge Question, and enter your Challenge Question Answer. Step 4: Select Save to update your challenge question. Manage Two-Factor AuthenticationStep 1: Log into HARP – you will land on your User Profile. Step 2: To update your challenge question, select Two-Factor Devices in the left navigation – you will see a list of your existing two-factor authentication devices. Step 3: To add a new two-factor authentication device, select the Device Type, follow the instructions, and select Send Code. Step 4: Enter the security code to verify the device and select Submit. Step 5: To remove a device, select the associated Remove link for the device you would like to remove. Step 6: Verify you want to remove the device and select Remove – the device will be removed from your list of two-factor authentication devices. | | Column |
|---|
| | Panel |
|---|
| borderColor | #254b78 |
|---|
| titleColor | #ffffff |
|---|
| borderWidth | 1 |
|---|
| titleBGColor | #254b78 |
|---|
| borderStyle | solid |
|---|
| title | Video: HARP Password Reset |
|---|
| | Widget Connector |
|---|
| width | 100% |
|---|
| url | http://youtube.com/watch?v=CXt1lEiARAs |
|---|
| height | 100% |
|---|
|
|
| Panel |
|---|
| borderColor | #254b78 |
|---|
| titleColor | #ffffff |
|---|
| borderWidth | 1 |
|---|
| titleBGColor | #254b78 |
|---|
| borderStyle | solid |
|---|
| title | Video: HARP User Profile |
|---|
| Account Deactivation
Accounts are required to be deactivated after 2 years of inactivity. Once an account is deactivated due to inactivity, it cannot be recovered. Please ensure you log into your account periodically to avoid account deactivation. If you encounter difficulty logging in, follow the account recovery steps outlined above. Following Account DeactivationStep 1: Reregister by going to https://harp.cms.gov/register. Step 2: Enter your profile information (you may use the same personal and corporate email addresses as your deactivated account) and select Next. Step 3: Choose a different user ID from your deactivated account, enter your password and challenge question, and select Next. Step 3a: If your profile information fails to verify your identity, you have two options: - If you think you know what you entered incorrectly, you can retry remote proofing by returning to the Profile Information screen and selecting Retry Remote Proofing. Entering the last four digits of your SSN and date of birth or your Reference Number will pre-populate the Profile Information fields.
- Call Experian to verify your identity over the phone and then enter your reference number on the Profile Information screen by selecting Enter Reference Number. This will pre-populate the Profile Information fields.
Step 4: Your new account has been created and you will receive a confirmation email. Step 5: Select Login to Complete Setup to log into HARP and set up two-factor authentication. Once you have set up two-factor authentication, feel free to log into your respective CMS application. Follow your application’s instructions for how to request a role as all roles associated with your deactivated account will have been removed. Managing HARP User Profile
| Widget Connector |
|---|
| width | 100% |
|---|
| url | https://www.youtube.com/watch?v=2kxiqIp86GU&list=PLaV7m2-zFKphoCXj7sIx2G1fwMZQQ0EJP&index=2 |
|---|
|
Step 1: Log into HARP – you will land on your user dashboard. Step 2: To edit your Profile Information, select View/Edit Profile Information. Step 3: Select the Edit button and modify your information, such as Email Address, Home Address, etc. Note: You cannot update your First Name, Last Name, or Date of Birth in your User Profile. Call your application’s help desk if you need to update these fields. Step 4: To allow the HARP team to reach out to you for user feedback, select the checkbox to opt into user feedback sessions. Step 5: Select Save to save your changes. Change PasswordStep 1: Log into HARP – you will land on your user dashboard. Step 2: To change your password, select Change Password. Step 3: Enter your Old Password, New Password, and Confirm New Password. Step 4: Select Save to change your password. Update Challenge QuestionStep 1: Log into HARP – you will land on your user dashboard. Step 2: To update your challenge question, select Update Challenge Question. Step 3: Enter your Password, select a new Challenge Question, and enter your Challenge Question Answer. Step 4: Select Save to update your challenge question. Manage Two-Factor AuthenticationStep 1: Log into HARP – you will land on your user dashboard. Step 2: To update your challenge question, select Manage Two-Factor Devices – you will see a list of your existing two-factor authentication devices. Step 3: To add a new two-factor authentication device, select the Device Type, follow the instructions, and select Send Code. Step 4: Enter the security code to verify the device and select Submit. Step 5: To remove a device, select the associated Remove link for the device you would like to remove. Step 6: Verify you want to remove the device and select Remove – the device will be removed from your list of two-factor authentication devices.
|
|
|
| Horizontal Navigation Bar Page |
|---|
|
| Section |
|---|
Each organization needs to designate at least one Security Official (SO) who will be responsible for approving individuals for access to various programs within their organization. Below are the steps for requesting to be assigned as your organization’s SO for a Program. Once your request is approved, you will review and approve requests from members of your organization for access to the desired programs. You will also remove users’ access to services no longer needed. | Widget Connector |
|---|
| width | 100% |
|---|
| url | https://www.youtube.com/watch?v= |
|---|
|
2kxiqIp86GU| cBtjA5SIeE4&list=PLaV7m2-zFKphoCXj7sIx2G1fwMZQQ0EJP&index= |
|
2height |
| | Horizontal Navigation Bar Page |
|---|
|
| Column |
|---|
Requesting the Security Official (SO) Role in HARP
If your organization does not already have at least one SO assigned to approve access requests for a program, please view more information here: Access to Services If your organization already has at least one SO assigned and your application uses HARP for role requests, do the following: Step 1: Log into HARP – you will land on your user dashboard. From there, select User Roles. Step 2: Select Request a Role. Step 3: Select the desired Program and select Next. Step 4: Select your Organization and select Next. Step 5: Select the Security Official role and select Submit. Step 6: You will be notified via email when your role has been approved or rejected by an existing SO.
NOTE: It's beneficial to have at least two SOs request the role. Therefore, if one SOs is on vacation or leaves the company the backup can still approve role requests. To add additional SOs please have the desired user follow the steps above. If you are having issues please reach out to the Contract Onboarding team for assistance. Contact by email at ISGContractorOnboardingServices@cms.hhs.gov or by Slack at #help-contract-onboarding |
| | Section |
|---|
Each organization needs to designate at least one Security Official (SO) who will be responsible for approving individuals for access to various programs within their organization. Below are the steps for requesting to be assigned as your organization’s SO for a Program. Once your request is approved, you will review and approve requests from members of your organization for access to the desired programs. You will also remove users’ access to services no longer needed. A tutorial video on HARP Security Official is available on YouTube: http://youtube.com/watch?v=cBtjA5SIeE4 | Section |
|---|
| Column |
|---|
Requesting the SO Role in HARPIf your application uses HARP for role requests, do the following: Step 1: Log into HARP – you will land on your user dashboard. From there, select User Roles. Step 2: Select Request a Role. Step 3: Select the desired Program and select Next. Step 4: Select your Organization and select Next. Step 5: Select the Security Official role and select Submit. Step 6: You will be notified via email when your role has been approved or rejected. Approving User Roles in HARP
Step 1: Log into HARP – you will land on your user dashboard. From there, select Security Official. Step 2: You will land on the Role Requests screen and see a list of pending role requests. Step 3: Select the checkbox for one or many requests. Step 4: Select Approve or Reject. Step 5: An email will be sent to the requester notifying them of approval or rejection. Removing User Roles in HARP
Step 1: Log into HARP – you will land on your user dashboard. From there, select Security Official. Step 2: Select User Lookup in the left navigation. Step 3: Choose your Program and Organization. Step 4: Use the search bar to search for users by first name, last name, email, or user ID. Step 5: Select a user's name to see their User Roles and Profile Information. Step 6: Select the Remove link for the User Role you would like to remove. Step 7: Confirm the removal. Step 8: The user's role will be removed from the list of User Roles. Viewing Request History in HARP
Step 1: Log into HARP – you will land on your user dashboard. From there, select Security Official. Step 2: Select Request History in the left navigation. Step 3: Optionally, use the search bar to search for a previous request by name or request ID. Step 4: Select View per request to see the request details, including completion date, organization, role, and whether the request was approved or rejected. | | Column |
|---|
| Panel |
|---|
| borderColor | #254b78 |
|---|
| titleColor | #ffffff |
|---|
| borderWidth | 1 |
|---|
| titleBGColor | #254b78 |
|---|
| borderStyle | solid |
|---|
| title | Video: HARP Security Official |
|---|
| | Widget Connector |
|---|
| width | 100% |
|---|
| url | https://www.youtube.com/watch?v=cBtjA5SIeE4&list=PLaV7m2-zFKphoCXj7sIx2G1fwMZQQ0EJP&index=5 |
|---|
| height | 100% |
|---|
|
|
|
|
|
| Horizontal Navigation Bar Page |
|---|
|
| Section |
|---|
| Column |
|---|
Frequently Asked Questions (FAQ)
| Expand |
|---|
| title | What are the HARP user ID requirements? |
|---|
| User IDs must be between 6-100 characters and unique (cannot already be taken by another user). |
| Expand |
|---|
| title | What are the HARP password requirements? |
|---|
| Passwords must be a minimum of 12 characters and include a lowercase letter, uppercase letter, number (0-9), and symbol (!@#$%^*). They cannot contain first name, last name, or part of user ID. |
| Expand |
|---|
| title | Why do I need to enter my personal information to register? |
|---|
| HARP is a secure identity management portal and asks for personal information to verify the user's identity. HARP uses Experian to remotely proof users by taking user-entered data, such as date of birth and social security number (SSN), to generate a list of personal questions for the user to answer to verify his/her identity. |
| Expand |
|---|
| title | What is Remote Identity Proofing? |
|---|
| - RIDP is the process of validating sufficient information that uniquely identifies you (e.g., credit history, personal demographic information, and other indicators). This method is used for verifying the identity of a user as opposed to manual proofing or in-person proofing. If you are requesting electronic access to protected CMS information or systems, you must be identity proofed to gain access.
- CMS uses the Experian identity verification system to remotely perform identity proofing. Experian is used by CMS to confirm your identity when you need to access a protected CMS Application.
- You may have already encountered RIDP through various interactions with banking systems, credit reporting agencies, and shipping companies.
- When you log in to HARP, you will have the option to RIDP. You will be asked to provide a set of core credentials which include:
- Full Legal Name, Social Security Number, Date of Birth, Current Residential Address
- Experian will use your core credentials to locate your personal information in Experian and generate a set of questions. Experian will attempt to verify your identity to the appropriate level of assurance with the information you provided. Most users can complete the ID proofing process in less than five minutes. If you encounter problems with RIDP, you will be asked to contact Experian Support Services via telephone at (866) 578-5409 to resolve any issues.
|
| Expand |
|---|
| title | What happens if my identity cannot be verified during the online RIDP process? |
|---|
| If you cannot identity proof online, you will be asked to contact the Experian Verification Support Services Help Desk at (866) 578-5409. The system will provide you with a Reference Number to track your case. For security purposes, the Experian Help Desk cannot assist you if you do not have the reference number. |
| Expand |
|---|
| title | Why did my password expire? |
|---|
| Account passwords are required to be reset after 60 days of inactivity. Please remember to log in within this period to avoid password expiration. |
| Expand |
|---|
| title | What do I do if my account was deactivated? |
|---|
| If your account has been deactivated, it cannot be recovered. However, you may use our registration portal to create a new account. Although you may re-register using the same email address, you will have to select a new user ID. Your previous roles will not be available and will need to be requested again. |
| Expand |
|---|
| title | Why did my account get deactivated? |
|---|
| Accounts are required to be deactivated after 2 years of inactivity. Once an account is deactivated due to inactivity, it cannot be recovered. If you encounter difficulty logging in and wish to access your account before deactivation, utilize the built-in self-service functions to recover your User ID or password. Note: these recovery methods are available only for active accounts |
|
|
| | Horizontal Navigation Bar Page |
|---|
| FAQ| Anchor |
|---|
| General | General | | Panel |
|---|
| borderColor | #254b78 |
|---|
| titleColor | #ffffff |
|---|
| borderWidth | 1 |
|---|
| titleBGColor | #254b78 |
|---|
| borderStyle | solid |
|---|
| title | General |
|---|
| | Expand |
|---|
| title | What are the HARP user ID requirements? |
|---|
| User IDs must be between 6-100 characters and unique (cannot already be taken by another user). |
| Expand |
|---|
| title | What are the HARP password requirements? |
|---|
| Passwords must be a minimum of 12 characters and include a lowercase letter, uppercase letter, number (0-9), and symbol (!@#$%^*). They cannot contain first name, last name, or part of user ID. |
| Expand |
|---|
| title | Why do I need to enter my personal information to register? |
|---|
| HARP is a secure identity management portal and asks for personal information to verify the user's identity. HARP uses Experian to remotely proof users by taking user-entered data, such as date of birth and social security number (SSN), to generate a list of personal questions for the user to answer to verify his/her identity. |
| Expand |
|---|
| title | What is Remote Identity Proofing? |
|---|
| - RIDP is the process of validating sufficient information that uniquely identifies you (e.g., credit history, personal demographic information, and other indicators). This method is used for verifying the identity of a user as opposed to manual proofing or in-person proofing. If you are requesting electronic access to protected CMS information or systems, you must be identity proofed to gain access.
- CMS uses the Experian identity verification system to remotely perform identity proofing. Experian is used by CMS to confirm your identity when you need to access a protected CMS Application.
- You may have already encountered RIDP through various interactions with banking systems, credit reporting agencies, and shipping companies.
- When you log in to HARP, you will have the option to RIDP. You will be asked to provide a set of core credentials which include:
- Full Legal Name, Social Security Number, Date of Birth, Current Residential Address
- Experian will use your core credentials to locate your personal information in Experian and generate a set of questions. Experian will attempt to verify your identity to the appropriate level of assurance with the information you provided. Most users can complete the ID proofing process in less than five minutes. If you encounter problems with RIDP, you will be asked to contact Experian Support Services via telephone at (866) 578-5409 to resolve any issues.
|
| Expand |
|---|
| title | What happens if my identity cannot be verified during the online RIDP process? |
|---|
| | If you cannot identity proof online, you will be asked to contact the Experian Verification Support Services Help Desk at (866) 578-5409. The system will provide you with a Reference Number to track your case. For security purposes, the Experian Help Desk cannot assist you if you do not have the reference number For more questions, visit the full FAQ on the HARP Help page |
|
|
