- Created by Angel Tucker, last updated by Monica Avila on Jul 16, 2025 50 minute read

 QualityNet Slack iconQualityNet Slack
Slack is a digital based collaboration platform that allows you to connect with individuals as well as groups within the Center for Clinical Standards and Quality (CCSQ) Community using a variety of different methods including: Channels, Direct Messaging, Voice Calls, Screen Share, File Sharing and more. Get the details in this QualityNet Slack Onboarding Welcome document.
CCSQ QualityNet Slack is a Health Care Quality Information System (HCQIS) Access Roles and Profile (HARP) (Centers for Medicare & Medicaid Services (CMS) Okta) integrated. If you plan to use QualityNet Slack, first obtain a HARP ID and then submit a request for a QualityNet Slack user role. The Security Official (SO) within your organization will review and approve the role request.
APP INTEGRATIONS | SPECIAL FEATURES | IMPORTANT SLACK CONCEPTS | TRAINING CLASSES | YOUTUBE PLAYLIST
CCSQ QualityNet Slack has a number of application integrations which aim to enhance your user experience and ultimately allow you to work more efficiently. If you would like to submit an app integration request please contact the #help-slack channel or create a ticket in the QNASK Jira project.
What is it? If you are part of IT Services, you can get a special email address to send notifications from any service that will show up in your channel of choice. Each integration has its own email address and customizable name and icon. Notifications configured for alerts in CCSQ QualityNet Slack Channels can only have hostnames and Internal (non-resolvable) IPs. Below are samples of how the Email app provides value:
• NetIM Alerts can be configured to send up/down alerts to include hostname to send to a defined Slack Channel(s).
• Team Distribution lists/mail boxes within Outlook can send email to a Slack Channel.
• BuildDevOps reporting tools (Splunk, Nagios) can be configured to send alerts to a defined Slack Channel(s). Alerts frequently contain the hostname and Internal IP of the instance that triggered the alert. This notifies BuildDevOps teams there is an issue with a DevOps instance.
Who is it for? Information Technologies (IT) Services
Why use it? Users or teams can send alerts and notifications to a CCSQ QualityNet Slack channel.
How? Please contact the #help-slack channel or create a ticket in the QNASK Jira project.
What is it? The Giphy app lets you search a library of animated GIFs and share them in CCSQ QualityNet Slack.
Who is it for? Any Slack user
How? The steps to add GIFs to your messages are:
1. Click on the Emoji smiley face icon within the message composer.
2. Choose the GIFs tab in the upper right of the pop-up window.
3. Select a GIF and it will insert directly into your Slack messages.

Alternatively:
- Type in the message box: \giphy
- Click enter
- Click Send
- Now fill in the word or phrase you’d like to search for in the pop-up box. Once you find the gif you like, Click Share.
What is it? GitHub Enterprise app expands GitHub by posting notifications of commits and pull requests to a channel in CCSQ QualityNet Slack.
Who is it for? Developers, QA engineers, project managers, release engineers, operations and managers
Why use it? You can now be instantly notified through a Slack channel whenever there is a commit or pull request made in your GHE organization. Notifications can be configured in both the repository and at the organization level.
Also expect to enjoy:
- Code reviews
- More information for your team in Slack when you share links to GitHub activities and properties like:
- Pull requests
- Issues
- Linked comments
- Code snippets
- Developer profiles
- Take actions with slash commands - Slack conversations often lead to decisions and actionable takeaways. Start on next steps from Slack with slash commands for common GitHub actions, using /github [action] [resource]. For example, these commands let you:
- Close an issue or pull request
- Open a new issue using a Slack dialog
- Reopen an issue or pull request
How? Please contact the #help-slack channel or create a ticket in the QNASK Jira project.
What is it? Jenkins CL app expands Jenkins by posting build start, success, and failure notifications to a channel in CCSQ QualityNet Slack.
Who is it for? Developers, QA engineers, project managers, release engineers, operations and
managers
Why use it? You can now be instantly notified through a CCSQ QualityNet Slack channel of your Jenkins build results.
How? Please contact the #help-slack channel or create a ticket in the QNASK Jira project and provide the CCSQ QualityNet Slack channel(s) where you would like to receive notifications and please also include the name of your Jenkins Master.
What is it? New Relic is a tool that monitors applications and servers in the CCSQ cloud. The New Relic integration with CCSQ QualityNet Slack allows it to securely send notification alerts (containing sensitive information) to a specific Slack channel. Sensitive information will consist of one host and private IP only.
Who is it for? Developers, Quality Assurance (QA) engineers, operations, and managers.
Why use it? You can now be instantly notified through a CCSQ QualityNet Slack channel of alerts sent by New Relic.
How? Open a ServiceNow ticket, assign to ESS DevSecOps team, and provide the Slack channel(s) where you would like to receive notifications. Include the name of your New Relic account. Alternatively, New Relic notifications can be requested during your migration to New Relic.
Best Practices
Instead of using a public or team channel, organizations should have a dedicated private CCSQ QualityNet Slack channel to access New Relic alerts.
What is it? The QualityNet Confluence integration with Slack allows Confluence to securely send notifications about project updates to a specific Slack channel with a direct link to the update. The integration connects Confluence spaces to your Slack channels so the whole team has one conversation and is kept up-to-date.
Who is it for? Anyone who has access to CCSQ QualityNet Slack that would like real time updates from QualityNet Confluence.
Why use it? Relevant information at your fingertips! Give your team members constant, accurate, and up-to-date Confluence information about work being done on team projects. Let team members know when you’ve created a new page, blog post, calendar entry, or page update. Select from 4 notification alerts – page creation, page update, blog post, and calendar entry.
How? Contact the #help-slack channel or create a ticket in the QNASK Jira project to get Confluence integrated with the Slack channel of your choice.
Best Practices
- Limit the number of integrations you request for one channel so that only relevant and significant notifications are received.
- Search for anything on Confluence from Slack by typing the command:
/confluence_server search topic
What is it? The Jira server integration with Slack allows Jira to securely send notifications about project/task updates to a specific Slack channel. The integration helps connect Jira Server projects to your Slack channels so the whole team has one conversation.
Who is it for? Anyone who has access to CCSQ QualityNet Slack that needs to view alerts from QualityNet Jira.
Why use it? Relevant information at your fingertips! Give your team members constant, accurate, and up-to-date Jira information about work being done on team projects. Let team members know when you’ve created an issue and its work progression.
How? Contact your QualityNet Jira project admin to configure CCSQ QualityNet Slack notifications for your respective projects. If you are unaware of who the project admin is for the project you want to receive notifications about, you can request help by reaching out through the #help-slackchannelor creating a ticket in the QNASK Jira project.
Best Practices
Limit what you request so that only relevant and significant notifications are received.
QualityNet Jira Integration with QualityNet Slack HCQIS CHAT Presentation
The QualityNet Slack integration with Lucid offers a quick and easy way to keep track of Lucid document updates! QualityNet Lucid has the ability to send you Direct Messages (DMs) notifying of Lucid document changes.
Integration Feature Highlights
Get and send notifications between Lucid and Slack. Take note, however, that only collaborators who have authorized the Slack integration in Lucid will get the Slack notifications. If you need to share with Guests, you must still utilize the link-sharing option in order to generate a Guest access share link.
Highlights of the integration feature include:
- Keep track of updates with Slack notifications for Lucid documents.
- See preview thumbnails when you share links to your Lucid documents in Slack.
- Start spontaneous brainstorming sessions with Slack shortcuts.
Steps to Integrate QualityNet Lucid to QualityNet Slack
You must repeat these steps for both Lucidspark and Lucidchart.
- Login to your Lucid account, and login to the Slack account to which you would like to connect.
- Click your profile image or initials in the top-right corner of your Lucid account.
- Select Account Settings.
- Click Apps & Integrations from the left-hand menu.
- Choose either the Lucidchart or Lucidspark tab at the top of the page to locate the Slack integration for that product.
- Find Slack in your list of integrations down below and select Add to Slack.
- Click Allow to grant permissions to your Lucidchart or Lucidspark account. Click Open in Slack on
- Your Lucid app should now be open in Slack. Click on some of the tips to learn about shortcuts.
Steps to Share a Lucid Document to QualityNet Slack
- Click the blue Share button at the top right corner of your Lucid document.
- Click the Slack icon that opens in the pop-up.
- Add people or channels with whom you want to share. (*Can only share to public channels)
What is it? The RSS integration allows you to subscribe to an RSS or Atom feed URL and receive updates in CCSQ QualityNet Slack. Feeds will be fetched periodically, and new items will be posted to the specified channel.
Who is it for? Users of SaaS products/services.
Why use it? Get notified immediately about any outage/service degradation of the product/service you are using.
How? Please contact the #help-slack channel or create a ticket in the QNASK Jira project.
Best Practices
With RSS you can find out immediately if there are any system issues rather than having to check status updates.
What is it? Zoom is an Audio/Video conferencing tool to make phone calls with video, audio and instant screen sharing. The CMS Zoom integration with Slack allows it to start meetings from any Slack channel, private group, or direct message using the slash command (/zoom). Note: Users with non-CMS Zoom accounts will not be able to start meetings.
Who is it for? Any CCSQ QualityNet Slack member that has a CMS Zoom account can use it to start or schedule a Zoom meeting. Any Slack member can join meetings even if they do not have a CMS Zoom account.
Why use it? Convenience! You can now instantly start and schedule Zoom meetings from any CCSQ QualityNet Slack channel, private group, or direct message using the /zoom slash command.
How? First time users, please remember to authorize Zoom during initial use by providing authorization for Slack to your CMS Zoom. When starting a Zoom call in a channel, use @member_username to notify the members whom you would like to invite.
Add members to your direct messages! This means that any existing direct message (DM) between you and other QualityNet Slack members gives you the ability to loop in others even after the conversation has already begun.
Select What’s Visible
Don’t want them to see some of the previous conversation? No problem! When you add people to a DM, messages and files will be visible to new members based on the conversation history you choose to include. You have the option of selecting whether they can see all or part of past conversations.
Steps:
1. Click the name(s) in the conversation header.
2. Click Add people to this conversation.

3. Type the name of the person you'd like to add, then select them from the list and click Next. You can include up to 9 people in a direct message.

4. Select an option to Include conversation history.

5. Click Done and select Confirm when you're ready.
A New DM Is Created
The conversation history you choose to include is moved to a new group DM that includes the new members. Members of the DM will now be notified automatically with a message posted to the relevant conversations.
QualityNet Slack is more efficient and fun to use than ever before with audio and video clips. A new built-in feature located in your message composition box now lets you record clips up to 3 minutes long!

Anyone in a channel or direct message (DM) can easily make a recording and share ideas, updates, or just say hello. Recipients can reply in a thread with a clip of their own. The feature is available on both desktop and mobile and allows you to share your screen while recording.
**Important Note!
Remember! Slack is neither a System of Record nor approved for sensitive information. Enjoy using Clips, but DO NOT share any Personally Identifiable Information (PII) or Protected Health Information (PHI) in CCSQ QualityNet Slack.
Recording a Video Clip
Follow these steps to record a clip:
From a channel or (DM), click the camera icon in the message field.
You can either record yourself speaking or a screen you’d like to share. Select with a click. You can also start sharing once you’re recording, and stop sharing at any time.
Click Record.
When you’re finished, click Stop.

5. You will now have the option to re-record, by selecting Retry. You will also have the option to download your recording.

6. When complete, click Next and add a message if you’d like.

7. Click the paper plane icon to send your clip.
Recording an Audio Clip
- From a channel or DM, click the microphone icon in the message field. Slack will start recording automatically.

2. When you’re finished, click the blue check mark button to stop recording.
3. Add a message if you’d like, then click the paper plane icon to send your clip.

Play a Clip
- Press the play button on a clip. For any clip, select 1X to adjust the playback speed.

- For video clips, click the closed caption icon to turn captions on or off.

3. All clips are automatically transcribed. To read a transcript, click the three lines icon on any clip.
Delete a Clip
- Hover over a clip and click the three dots icon.
- Click Delete clip.
- Click Yes, delete this clip.
Other commands available with the three dots icon include download, share, copy, open video in new window or thread, and copy video link.
QualityNet Slack allows you to add members to a channel in bulk. Add up to 1000 people to a channel at once! Here’s how:
- Open the channel to which you’d like to add people.
- Click the cluster of profile pictures in the top right.
- Click the Add people button .
- To add a few people, search for the members you'd like to add by name or email address and select them.
- Or to add a large group, paste a list of names or email addresses (numbering up to 1000) into the field.
- When you're done, click Add.
Bulk add members from existing channel to new channel or meeting invite
In some cases, you may want to add members from an existing channel to a new channel or a meeting invite. You can bulk copy and paste up to a 1000 of those channel member names or email addresses.
Here’s how to bulk copy those member names or emails:
- From your desktop, open a channel.
- Click the channel name in the channel header.
- Select the Settings tab.
- Click Copy member names or Copy member email addresses.
Note:
To add someone from a shared connect channel, it must be with their email address; inputting their username will not successfully add them.
![]() Every channel and DM has a built-in canvas all its own. Think of it as a bulletin or announcement board where you can store details about work and conversations happening there. Canvases are designed with real-time collaboration in mind. Use it for just about anything—from onboarding to newsletters to project tracking. Channel canvases can be viewed by anyone with access to the channel, while DM canvases are visible only to members of the DM.
Every channel and DM has a built-in canvas all its own. Think of it as a bulletin or announcement board where you can store details about work and conversations happening there. Canvases are designed with real-time collaboration in mind. Use it for just about anything—from onboarding to newsletters to project tracking. Channel canvases can be viewed by anyone with access to the channel, while DM canvases are visible only to members of the DM.
![]()
Like Having a Sticky Note
In addition to being in every channel, a canvas is available in every Direct Message you compose! Create a standalone canvas for anything you're working on. Share it in any channel, conversation, or Huddle to co-edit or get feedback. It’s like having a sticky note in your conversation. And if you prefer, you can restrict access to view-only anytime by person, channel or organization.
What Do You Do with a Canvas?
- Share your canvas to involve multiple editors.
- Leave comments on canvases.
- Mention people in the body of a canvas to notify them.
- Add meeting notes
- There’s a Meeting Notes template you can use, or create your own.
- Add action items.
- Drag and drop content like files, images, and videos.
- Embed data from third-party apps.
Accessing a Canvas ![]()
There are 4 ways to access a canvas. The Canvas icon where you can create or view an existing canvas is at the top of every channel with the tabs. You can also create or view a canvas from the ...More icon or the Create new + sign icon on the left bookmarks margin.
Method 1 – Click Add Canvas icon in the top tab of channel you’d like the canvas.![]()
Method 2 – Click the + icon top tab and click Canvas in the dropdown menu. This is a channel where there are already existing Canvases. 
Method 3 – Click More> Select Canvases> Click Create button on upper right.
Method 4 – Click the Create New+ sign above your Profile in the bottom left margin. Select Canvas.


It shares as a regular message and can either be set to show automatically or be clicked to open. When open, it displays as a full-page message in the channel. Or it can be further opened in a new tab as a standalone window. Rather than jumping back and forth, simply click on a canvas in the conversation to open it in a new window to keep context side by side.
Show by default Setting
The Show by default setting makes it easier to ensure your canvases are seen. It's easy! Just select to show your canvas by default and anyone who visits the channel will automatically see the canvas in the sidebar. Here are the steps to activate the setting:
1. Navigate to the channel canvas.
2. Click the three dots beside the canvas.
3. Click Show by default.
Channel members can still choose to close the canvas if they prefer not to see it. Once closed, it stays closed until they decide to re-open it.

New Layout Features
You can design the layout of your canvas any way you want. You now have even more formatting features like:
- File and link previews
- Files and links can be displayed as URLs or as cards in which they are displayed as a preview.
- In-line objects
- Add link previews, images, or files directly to your canvas.
- Objects no longer sit at the bottom of your message as attachments.
- Need to move something? Simply drag and drop it where you need it to go.
- Dividers
- Columns
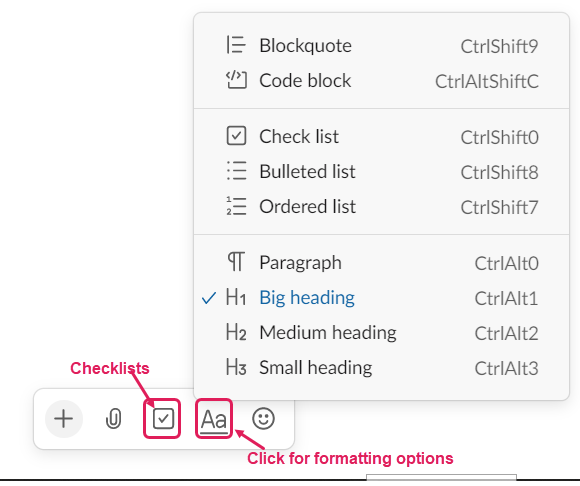
- Formatting toolbar with option of 4 different heading sizes
- Paragraph
- Big heading
- Medium heading
- Small heading
- Checklists – included in the formatting toolbar
Templates
There are many canvas templates tailor-made for common use cases. These templates will quickly get you started with a wide range of use cases including OOO coverage plans, employee onboarding, monthly newsletters, and more!
- To access canvas templates from the canvas icon at the top right of a channel: Click the Canvas icon, then click ...More to select a template.
- To access canvas templates from the More bookmark: Select Canvases. Now choose a template.
View Comments
To view comments:
- Click the 3 ellipses on the top right.
- Select View all comments.

3. Click the Filter icon to sort by Most recent, Unread or Archived.
![]()
Commenting on a Canvas
Comments on a canvas will behave like Threads, and all new replies will appear in your Threads view. Here’s how to comment:
- Open a canvas.
- Click on the plus sign in a speech bubble at the top right of the canvas. It will open up for you to add your comment.
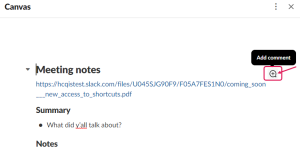
3. If comments have already been made, the number of comments will be indicated by a number in a speech bubble next to the message. In this case, click on the number and it automatically opens for you to add your comment..
![]()
4. Type your comment, then press Enter to send it.
Notifications
To notify someone directly in a canvas, mention them by using the @ symbol, followed by the member's name. As long as the canvas has been shared with the person you mention, they will receive a badge notification next to the Canvas view in their sidebar.
Members you mention in a canvas who do not have access permissions to the canvas will not be notified.
For more on Slack Canvas watch our QNet Chat Video Presentations:
- QualityNet Slack Canvas Jeopardy Show
- Canvas & Gif Picker – Listen in on a Huddle with Barbarasauraus and Snapper
Print Canvas
You can print any canvas shared in your workspace. Here's how:
- From your desktop, open the canvas you’d like to print.
- Click the three dots icon in the top-right corner.
- Select Print canvas.
- Review the print settings in the system dialog, then click Print.
You can also use your computer’s print settings to save your canvas as a PDF. On the Slack desktop app, links in a canvas will break when you save it as a PDF. To create a PDF with active links, open Slack in a web browser, then follow the steps to create a PDF. Here's how you can open Slack in a web browser:
- From the Home tab, click your workspace name in the sidebar, and locate your Slack URL.
- Open any web browser, then enter your URL.
- If prompted to sign in, enter your email address and click Sign In with Email. Check your email for a confirmation code from Slack and enter it.
- In the Open Slack.app pop-up, click Cancel.
- Click Use Slack in your browser.
- Create your PDF.
When Content Is Cut Off
Tables or lists in your canvas that are wider than the dimensions of a page will be cut off when printing or saving as a PDF. Using the print settings in your computer’s system dialog, you can try changing the page orientation from portrait to landscape, changing the paper size, or scaling the content to adjust the fit.
The Channel Tabs layout now replaces the bookmarks that once were the top of each channel.

The channel tabs include:
- Messages
- Default channel containing sent and read messages.
- Always the first tab under the channel name.
- Pins
- Previously known as Pinned Messages.
- Previously pinned messages visible by default. If not, tab will automatically appear after a pinned message or pinned link is added.
- Workflows
- Any previously added workflows.
- Tab will not appear if no workflows have been added.
- Canvas
- All previously created channel Canvas content visible in new, full-width view.
- If canvas is set to default auto-open, it will still automatically open in right-hand sidebar.
- Lists
- Tab will not appear if a List is not added to the channel.
- Files
- Tab not visible by default in a new channel.
- All shared links, files, and images in a channel appear in files tab for that channel.
- Bookmarks
- Tab will not appear if no previous bookmarks added to the channel.
- Previously bookmarked links can be found in the Bookmarks tab.
- Previous items stored in a folder will appear as a tab on the channel header with the same name.
- + Sign
- You have the ability to add additional tabs using the + sign. The maximum number of tabs is 10. They will appear in the channel header as you pin messages, bookmark links, share files and create workflows.
Additional tabs can be folders for bookmarked links. Bookmarked links can be organized into folders and accessed from the channel header. Here are the steps:
- From your desktop, open a channel or Direct Message.
- Click the "+" button in the header, then select Create a Folder.
- Give your folder a name, then click Create.
- Select the bookmark folder in the header, then click Add Bookmark.
- Enter the link, then add a name.
Click Add.
Tab Re-Order
The order of any tabs can be changed by dragging and dropping them. The only tab that cannot be moved is the Message tab. Hovering over tabs will provide content previews.
Channel Managers can allow either everyone or ONLY Channel Managers to edit tabs. Here’s how:
- Click the channel name to see Channel Details.
- Click Tabs.
- Select desired tab.
Select who can add, remove and reorder tabs
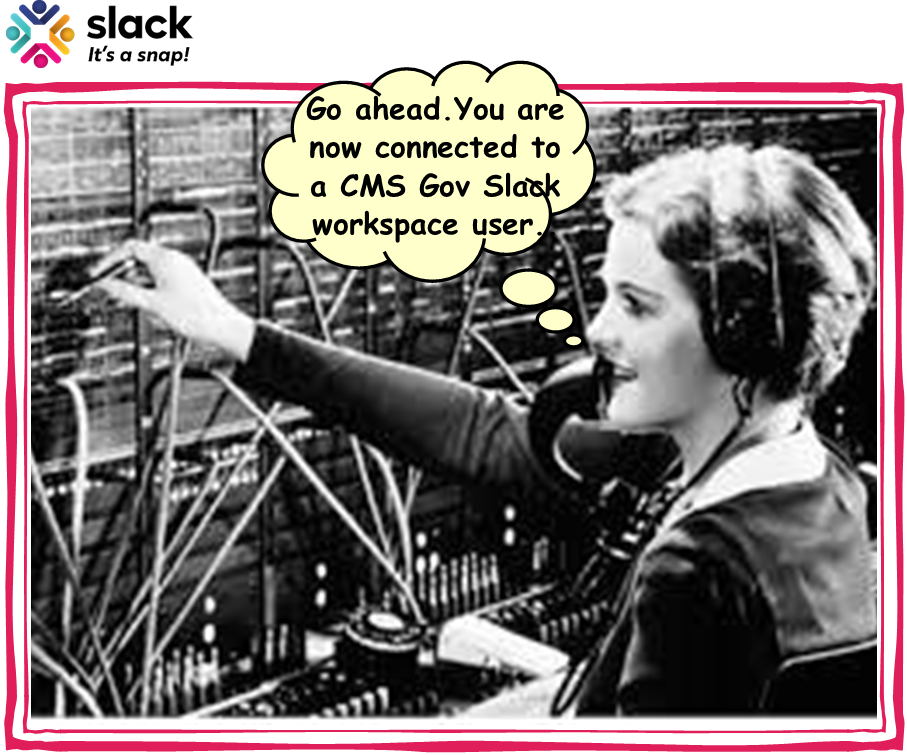
If you are in the QualityNet Slack workspace but would like to meet with someone from any CMS Gov Slack workspace, you now have the opportunity to be connected!
Go to #help-slack and make a request for creation of a special channel that allows you to invite CMS Gov Slack users to join you there. If approved, the channel will be available on QualityNet Slack for users from each of the workspaces to meet in real time. When you make your request include with whom you want to connect, their email, and the reason for your connection. You can request more than one new channel.
The new connected channels give you the ability to:
• Connect with users from CMS Gov Slack workspaces through specially created QualityNet channels
• Collaborate with CMS Gov Slack workspace users
• Send messages to CMS Gov Slack workspace users
• Make announcements and use any other Slack channel functionality to communicate with CMS Gov Slack workspace users
Note:
Just like an old-fashioned switchboard, you can only be connected through individual channels on QualityNet Slack and not to the entire CMS Gov Slack workspace of channels. In other words, it is not possible to jump onto CMS Gov Slack and join any channel. You must have specific connected channels created on QualityNet Slack by our QualityNet Slack team in order to communicate.
So go ahead. You are now connected!
Share Private Messages Option 1:
1. Hover over the message and click the Forward message icon on the toolbar that pops up.

2. A new pop-up window opens.
3. In the first field, search for the channel or person you are wanting to forward the message and add them.
4. Add an optional message if you'd like.

5. Click Forward.
6. If sending to a public channel, a warning message will ask you to confirm.
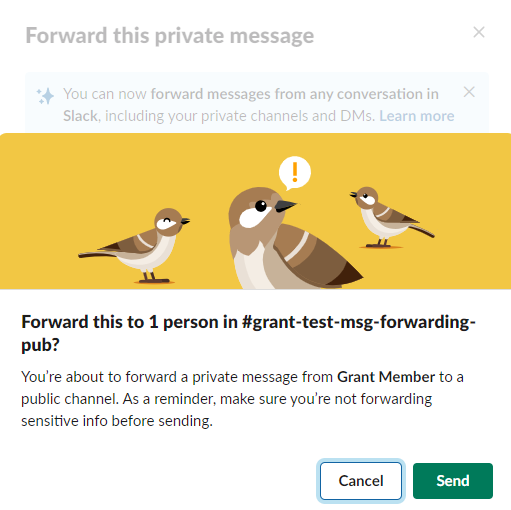
7. Click Send.
Share Private Messages Option 2:
1. Hover over the message and click the Forward message icon on the toolbar that pops up on the left.
2. Click Copy link.

3. Paste the link in the Direct Message or Channel you’d like to share the message.
4. A preview of what is being shared will appear underneath the link.
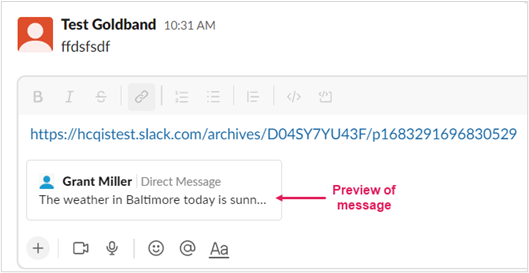
5. A warning will pop up that you are about to share a private conversation.

6. Click Send.
Using either option you’ll have just shared your private message!

Huddles is a Slack feature that works both inside a Slack channel or direct message. It's a quick and easy way to meet live with anyone in QualityNet Slack! If talking something out is faster than typing it out, you’ll want to start a huddle.
![]()
When a huddle is open, any member of the channel or direct message can come and go as they please. Attendees can share their screen, and others can draw on it. There is also an option for live captioning.
Starting a Huddle
To start a huddle:
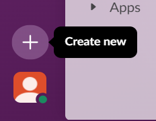
1.Click the Create new button to start a Huddle.
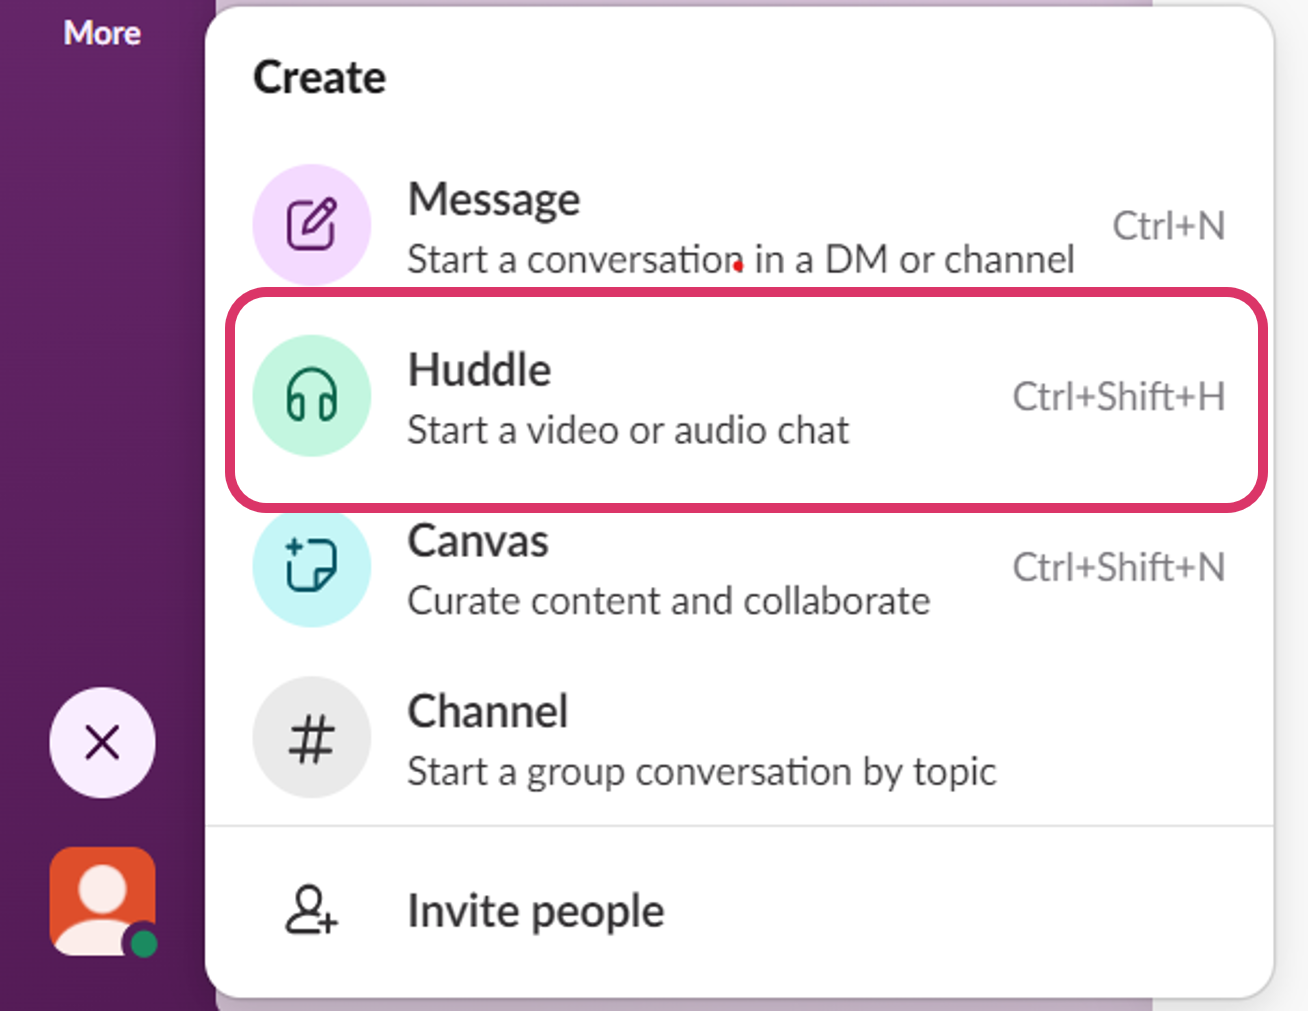
2.Select Huddle in the pop-up.
3.Fill in the person(s) or channel you’d like to huddle with.
4.Click Start a Huddle.
When you start a huddle in channel, channel members will see the active huddle in the sidebar, and you can invite any member to join you.

Once the huddle has started, you can click the microphone icon to mute yourself, the screen icon to share your screen, or the the 3 ellipses More options button, click Invite people icon to invite individuals to the huddle. 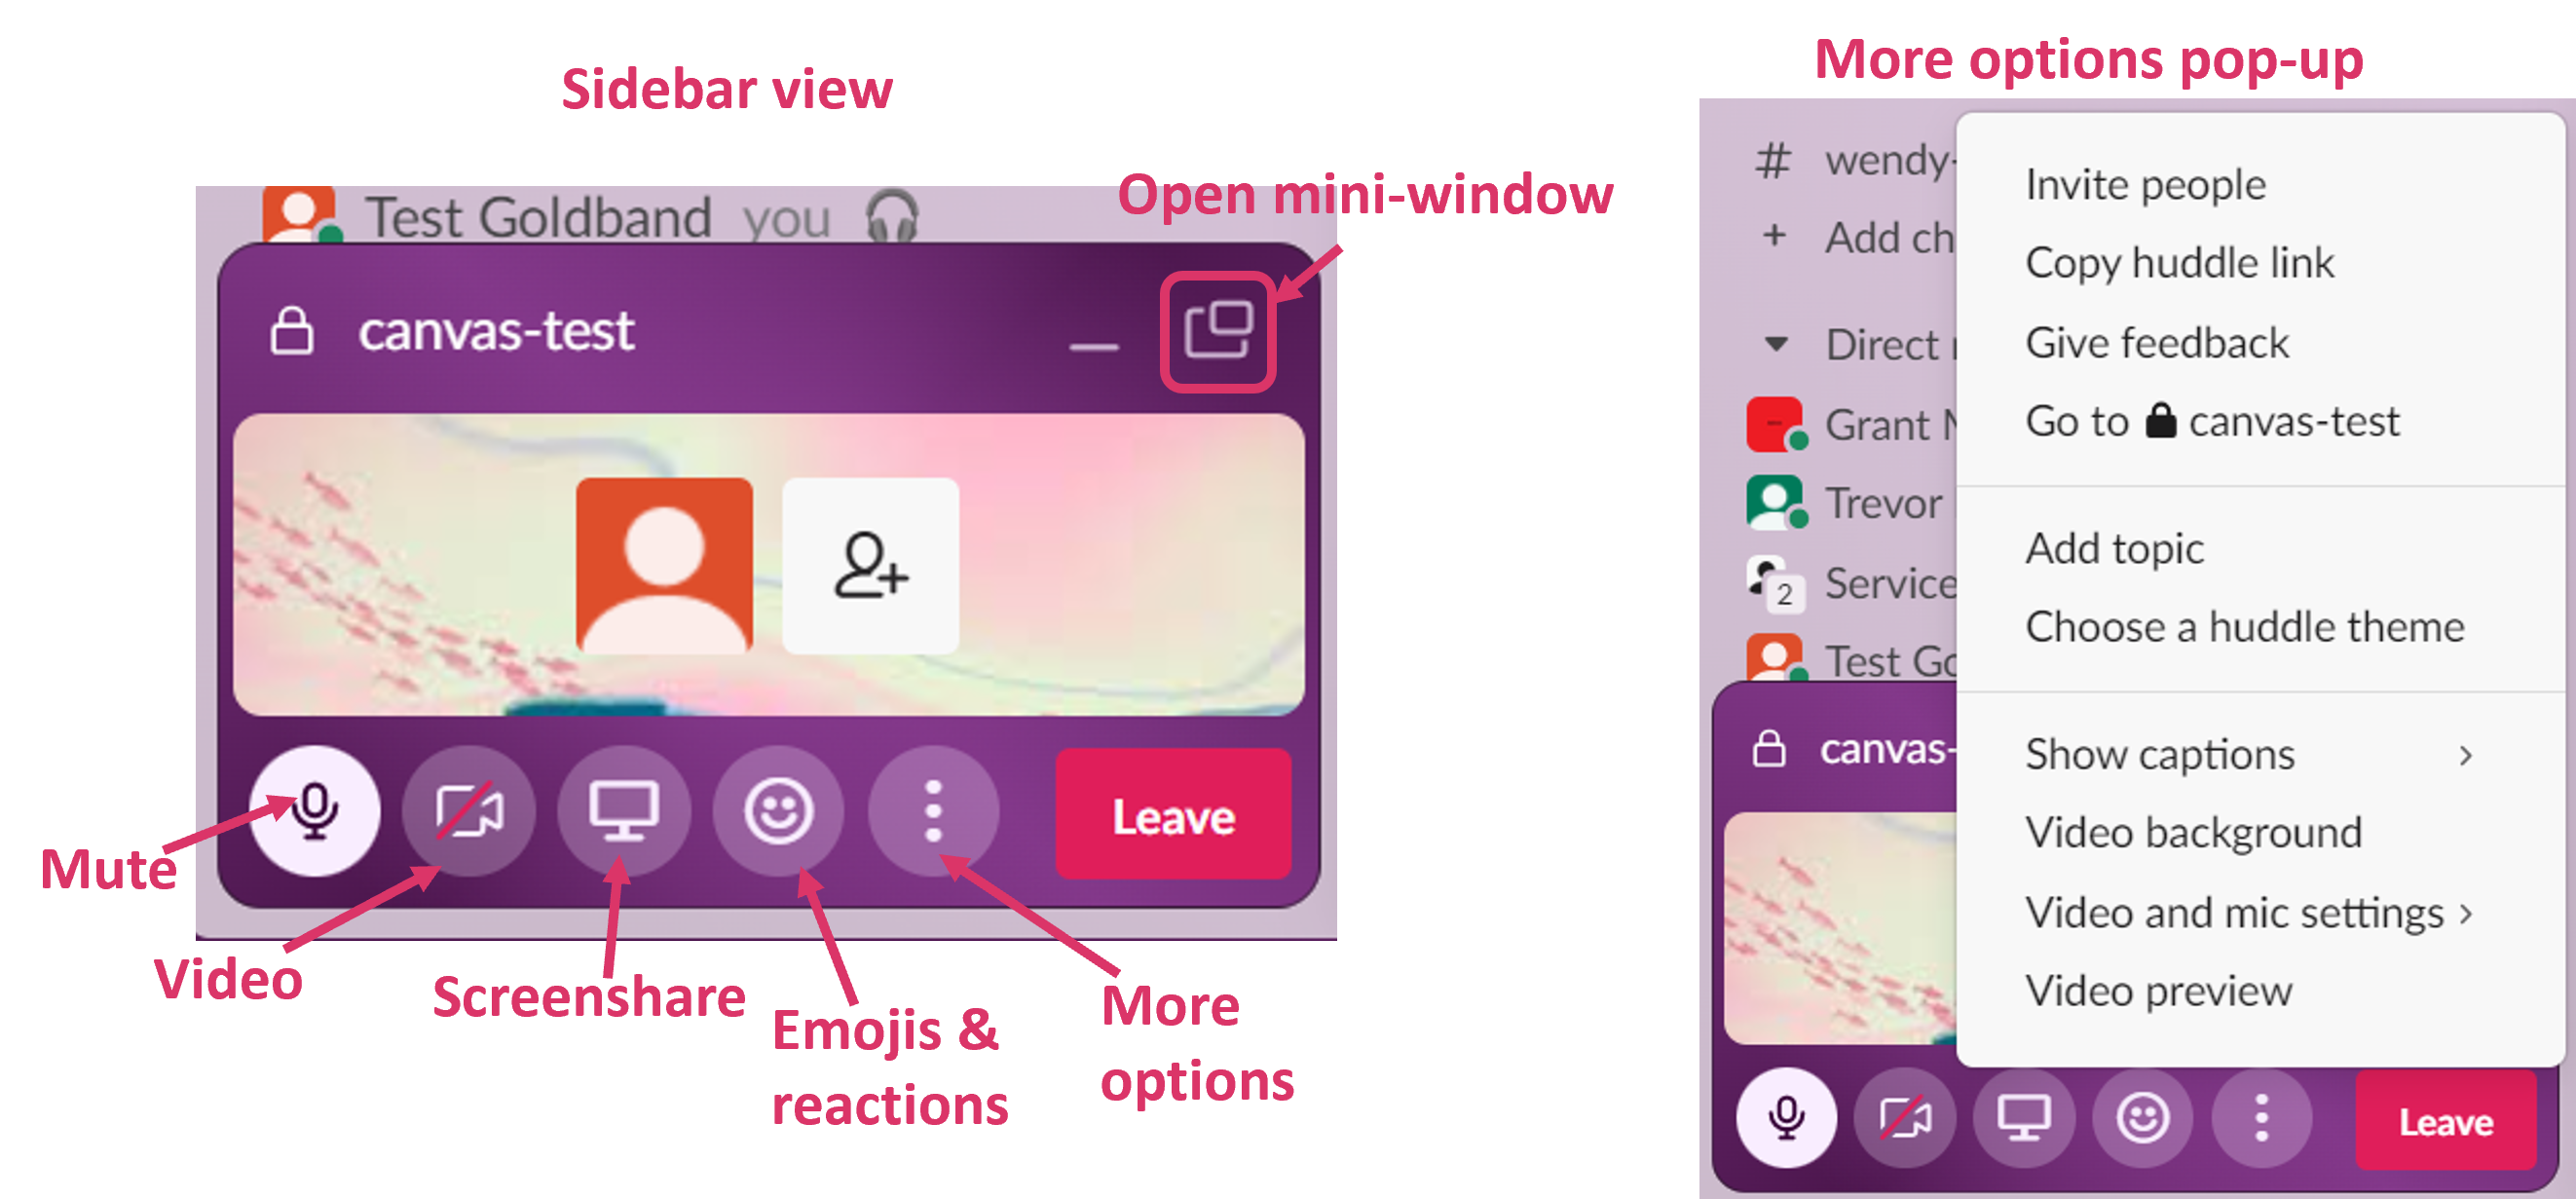
To turn on live captioning, click the name of the person actively talking in the bottom left corner of your screen. Click the three dots icon, then select Turn on captions.
To leave a huddle, click the Leave button at the bottom left corner of your sidebar.
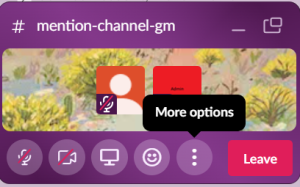 pink leave button at far right of toolbar
Huddle Links
All huddles have links people can use to join from anywhere, e.g. a message in Slack or a calendar invitation. To create a link:
1. From a channel or DM on desktop, click the conversation name in the bottom left corner of your sidebar.
2. Alternatively, right click on the conversation in the sidebar to find the link under 'copy'.
3. Click Copy huddle link.
4. Paste link wherever you’d like, including calendar invites.
5. Huddle will start when someone clicks the link to join.
Ways to use Huddles
Some great ways to use Huddles include:
- Open office hours – One or more persons can drop in anytime during those hours.
- Brainstorm sessions – These are great after you’ve left a meeting with a list of action items for your team. A quick huddle is a casual way to get everyone up to speed while the takeaways and goals are still fresh. Slack Huddles support screen sharing, so you can pull up a spreadsheet or document to log ideas or a calendar to discuss timelines.
- War room – After a new launch, a Huddle is a great way to have an open “room” to address feedback that rolls in.
- Social get-togethers – Huddles are a great way to gather for hangouts like lunch and happy hours without the stress of video.
Huddle Features
📹 Video with one click so you can be seen by others
📺 Multi-person screen sharing, drawing and cursors
🥳 Fun, relaxed atmosphere filled with your favorite emoji, reactions and “stickers”
💬 Message thread that automatically saves to channel
Pick three different views:
- Slack sidebar: where the huddle starts
- Mini window: pop out for a small view
- Large window: for screen shares and seeing bigger sized video
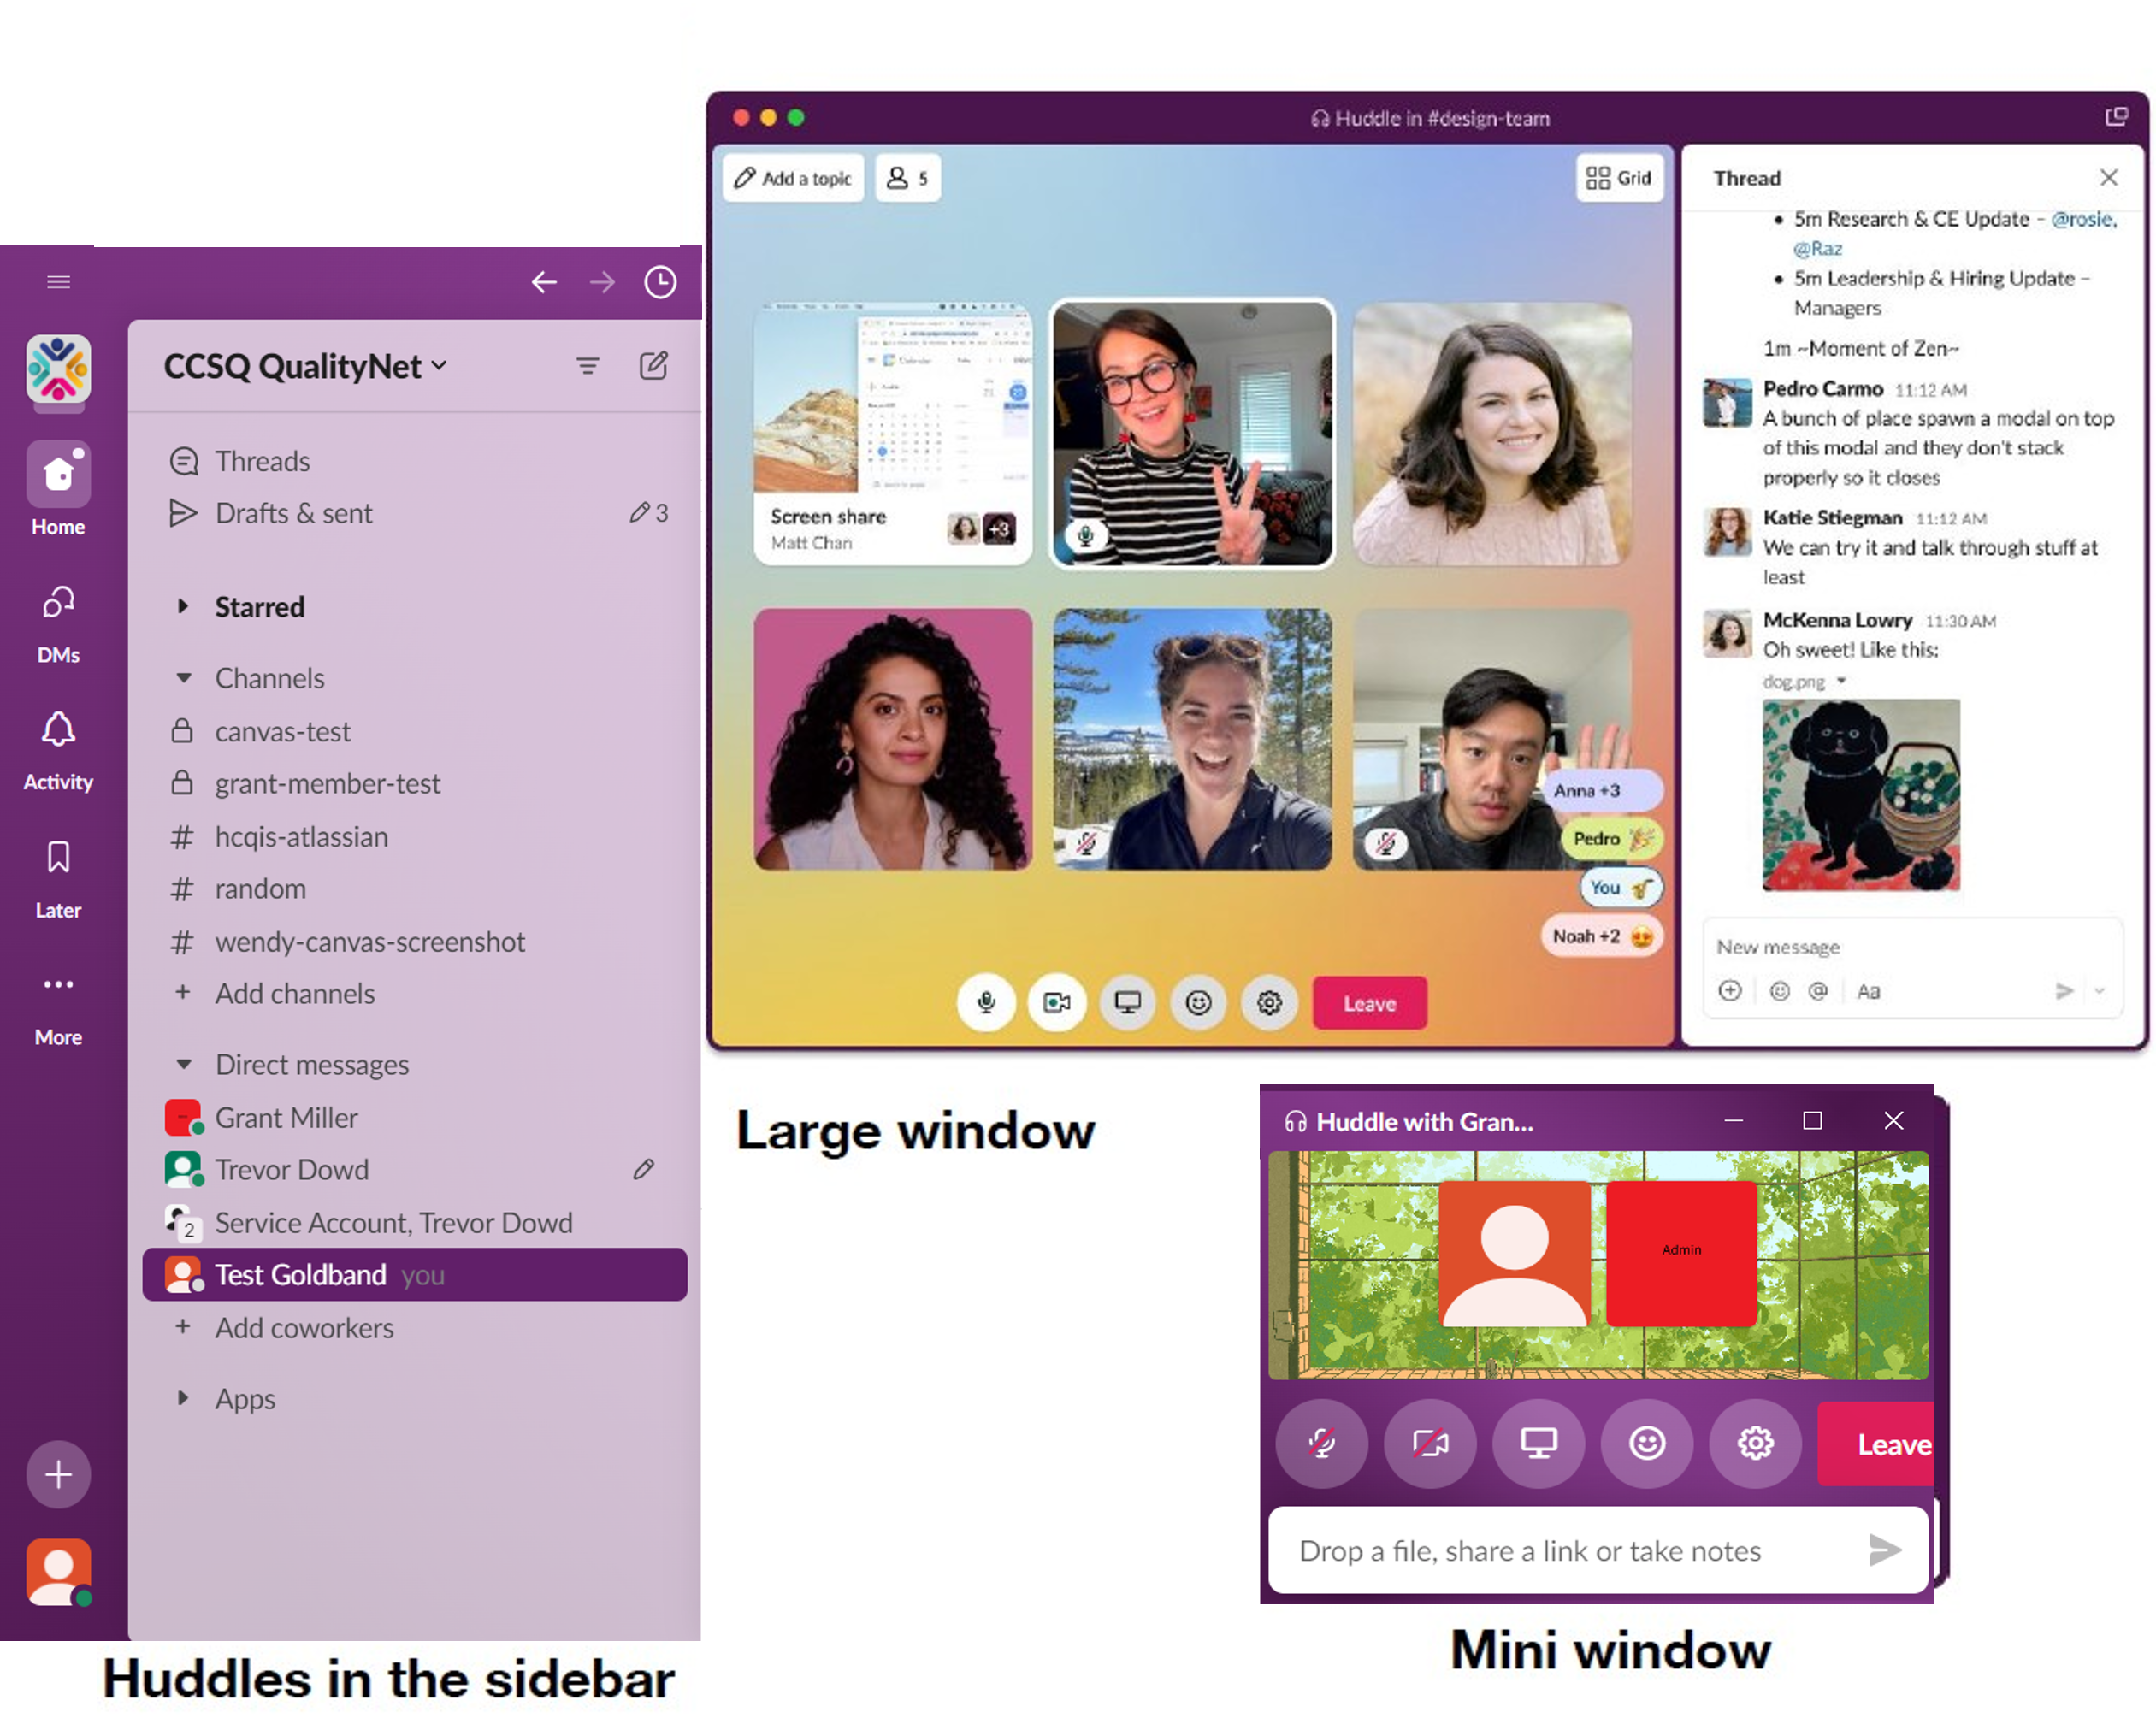
Popping out the Mini window
You can stay right in the Slack sidebar or you can pop the huddle out into a new window. The “pop-out” button will open a mini-window where you can see the participants and the message thread.

Opening the large window
When you click on a participants’ avatars, on their video, or on a screen share, a large window opens so you can get a better look at your team and their screens.

Dedicated message thread
Now you’ll have a dedicated message thread created in the conversation where you started the huddle. You can send messages, links and files just like you do in Slack channels and direct messages. All messages sent in the thread are automatically saved in the channel where the huddle started so you can always research a past conversation topic.
When the huddle is active, channel members can see a huddle block in the conversation. People who are not in the huddle can see the topic and the thread in this block. After the huddle is over, the huddle block stays in the channel where the huddle started.

Turn on video
Now you can turn on video in huddles. Simply click the camera icon. You can choose to hide our self-view. This will hide your view of yourself, but everyone else in the huddle can still see your video.
Reactions
Participants can send Reactions for their whole team to see. These reactions display briefly, then disappear.
- Effects are a special type of reaction that sends an animation.
- Stickers, like “raise hand”, are reactions that persist on your avatar until you remove them.

Huddles themes
You can add a theme to the background of your huddle to set the mood. All huddle participants see the same theme. So, changing the theme changes it for everyone in the huddle.
Live transcript
When enabled, live streaming captions accompany an ongoing huddle. Captions are not saved or shared after they huddle. However, you can copy and paste the transcription before leaving the huddle to have a recorded document.
Watch the Huddles QualityNet Chat Presentation from December 2022, Barbarasaurus Presents: Discovering the New Slack Huddles Features and the December 2023 Chat presentation on the New Slack Interface.
You are also strongly encouraged to register for the QualityNet Slack Huddles interactive training.
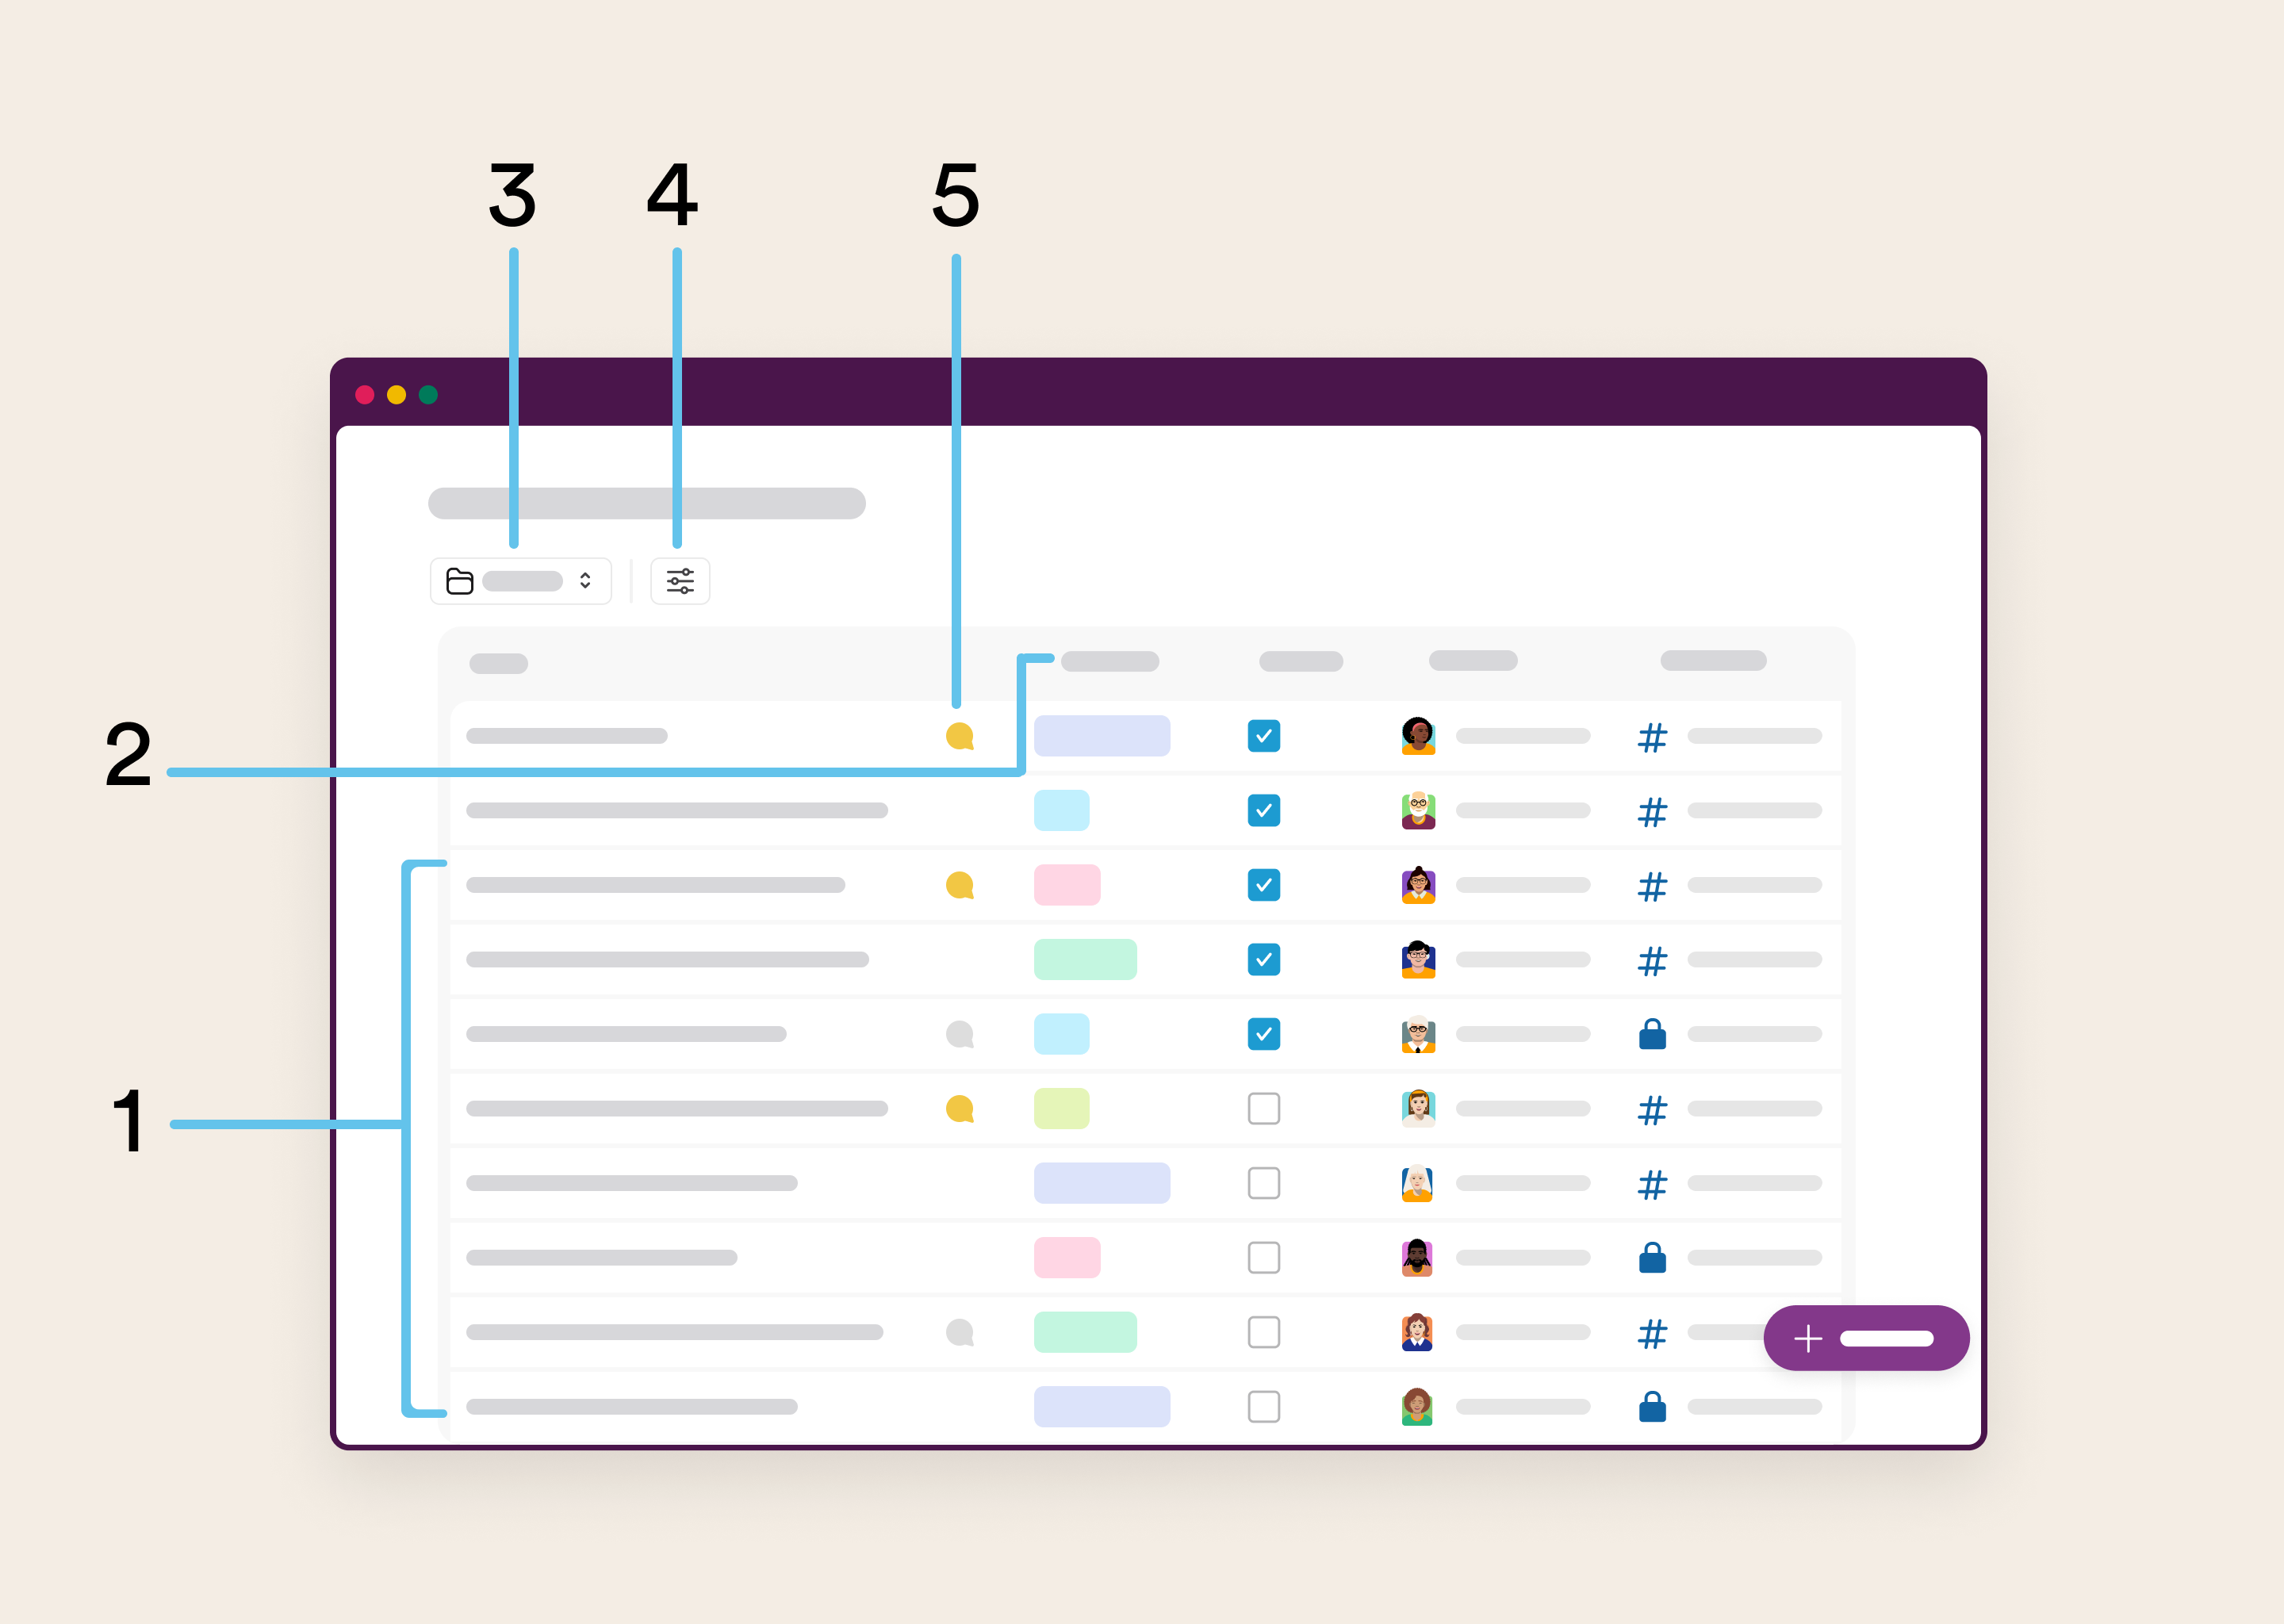
Lists are designed to align organization and collaboration on work happening in Slack. Use lists to keep track of tasks, stay aligned with your teammates in the flow of your conversations, and save time on your work with less switching between apps. No need to link to a Slack thread or copy and paste long Slack discussions in a Jira comment for further context when you use Slack Lists.
There are lots of ways to use lists. To get started, you can create your own or use one of the many templates available. With lists you can:
- Manage a project
- Plan and assign tasks, then track their status in a list shared with your project team.
- As you discuss project work with your team in the channel, use a list to track key tasks and action items.
- Triage requests
- Collect messages and triage them as requests in a list.
- Create a list to collect and track requests in a help channel and avoid the need to switch between programs.
- Plan team priorities
- Collaborate with your team to prioritize your quarterly projects.
Remediate the problem of your team’s ideas and goals scattered across channels, docs, and spreadsheets. Instead, create a catalog of planned projects in a list that you and your team can prioritize and organize.
How to Create a List
Start from scratch:
- From your desktop, hover over the More button in the left-hand Bookmark bar, then select Lists.
- Click New, then select List.

Use a template:
- From your desktop, hover over the More button in the left-hand navigation bar, then select Lists.
- Click New, then select New List.
- Choose a template from the column on the left, then click Use Template.
![]()
8 Different Templates
The eight templates from which to select are:
- To-do list
- Project tracker
- Feedback
- Quarterly planning
- Help requests
- Bug tracker
- Backlog
- Deal tracker
**Tip: To reuse a list you’ve already created, open the list, then click the three dots icon in the upper right corner and select Make a copy.

What You Can Do With a List
- Customize fields
- Add or edit fields like due dates, assignees, priority and more.
- Add items
- Each row in a list is a separate item. Items are individual tasks you need to track.
- Add messages to a list
- Add any Slack message to a list without navigating away from the conversation.
- Visualize list data
- Whether you created a list or you're viewing someone else's, you can adjust how list data appears to make it most relevant to you. Group, sort, and filter items by field, and choose if items are displayed in a table or a board view. Note: You need edit access to save views on a list you didn't create.
To enable any of these commands:
- Click the Filter icon underneath the list name.
- Select your command from the Edit view dropdown.
![]()

Collaboration
You can share lists anywhere in Slack, assign tasks to people, and add comments to items in a thread. Share a list in a channel or directly with team members to start collaborating. You can also set general access permissions to decide if people who find your lists when searching in Slack can view or edit them. Add assignees Add comments to items Each item in a list has a dedicated message thread no matter where the item is shared. Open an item to add questions, comments or updates in the thread. The Extras
|
Send an Email to a Slack Channel
Slack can help keep important communication in one place with the send email to Slack channel feature. This feature is most commonly used for system alerts and notifications.
Please note that Slack is neither a "System of Record" nor approved for sensitive information or inappropriate use. PII and PHI should never be sent using this feature.
To request an email address be created for one of your channels, please submit a Slack Email Request Form and a Jira ticket will be opened for you.
Be prepared to provide the following information:
- Business Requirement
- Explain the business objective or project impact associated with this request in the form of a user story (i.e. As [a user persona], I want [API For] so that [I can accomplish this goal]).
- Business Impact (legislative, % of users impacted)
- Identify if the impact is business-critical, alternatives exist, or nice to have
- What channel is this email requested for?
- Is this a private or a public channel?
- What is the source system that emails will generate from?
- Please specify the type of information that will be shared in emails sent to this channel? For example, application errors, AWS application specific information, sensitive information, etc. (if there is a screenshot available of the type of data that would be shared, please feel free to attach it to the ticket).
- Will any file attachments be sent in this email?
- If yes, what file type will the attachment be and what type of information will be shared in that attachment.
- Please identify alternatives available to you if the request is not approved.
- What domain(s) will the emails be sent from?
For any questions on this feature or anything related to QualityNet Slack, please reach out in the #help-slack channel.
If you would like a task reminder for yourself, someone else, or your entire team, QualityNet Slack can help you do that. You can even set a reminder for a conversation you’d like to come back to later. Here are the steps for each scenario.
To send a reminder to someone else or an entire channel:
- Click the
 plus icon in the message field.
 - Type in the word remind and select /remind.
- /remind will automatically fill in your composition box
- Next fill in the name of the individual using the @sign or the channel using the #sign.
- Compose the details of your message reminder.
- Last, add in the time.
- You’re all set! Click send and Slackbot will deliver your reminder to either the individual or channel at the desired time.


Examples of Reminder Formats

To send a reminder to yourself:
- Click the
 plus icon in the message field.
 - Type in the word remind and select Set yourself a reminder.
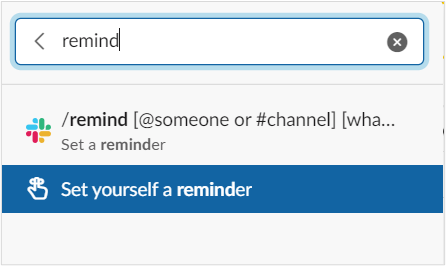
*Note:
You can set recurring reminders for yourself or a channel, but not for someone else. You can also set reminders to repeat by the day (ex. every Monday) but not in time increments (ex. every hour).
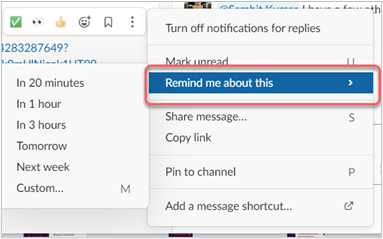
To set a reminder for a conversation:
- Hover over conversation and click the 3 dots.
- Click Remind me about this.
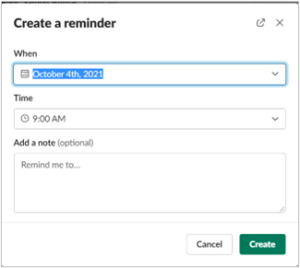
- Select time.
- Custom lets you create an additional note.

Help your team find and organize channels important to their work using Slack custom Shared Sidebar Sections. Shared Sidebar Sections can help your team keep organized and have a special location for their most important work. Perhaps you’d like to onboard new employees so that they immediately have default team channels in their sidebar; custom Shared Sidebar Sections will quickly and efficiently help you do that. Shared Sidebar Sections are powered by User Groups. In other words, a User Group’s default channels can now automatically appear as a shared section in each group member’s sidebar. Create sections when you create a new User Group or for existing User Groups. |
Steps to Create a Shared Sidebar Section for New User Groups
Your new Shared Section now automatically appears in your User Group members’ sidebars. All the channels you included will be displayed in that section. |
Too many channels to keep track of in your Slack sidebar? No problem! Just organize them into sections. Your sidebar is only visible to you and won't affect what your coworkers see. So set them up however you’d like.
Here's how:
- From your desktop click the Home icon 😀 on the top left margin.
- Click the Channels section in the left sidebar.
- Click Create.
- Click Create section.
- Type a name for your custom section.
- Click Create.
**Tip: To create new custom sections and move multiple conversations at once, click any section name, then choose Manage > Edit all sections.
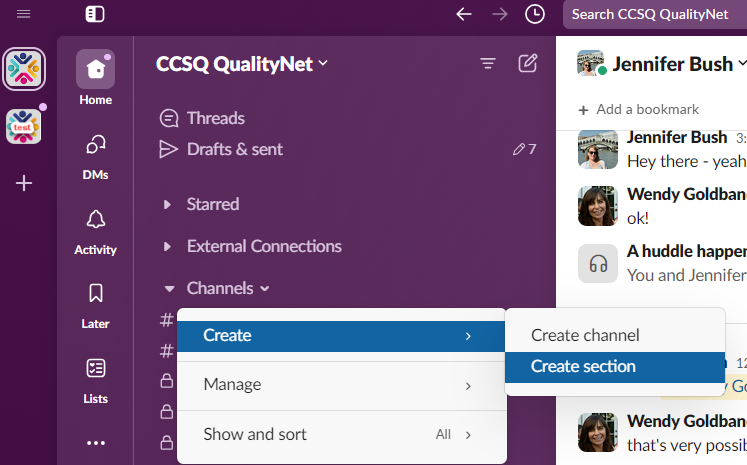
You can also organize any conversations by dragging and dropping them to a section from your sidebar, or follow the steps below to move a conversation you're viewing to a section:
- Open the channel or DM you'd like to move.
- Click the channel or member name(s) in the conversation header.
- Click the star icon (or the emoji associated with the custom section) by the channel or member name(s).
Select a custom section from the list or select Move to new section to create a new one.

Use Threads to Keep Organized

What is a thread?
Threads help you create organized discussions around specific messages. They let you discuss a topic in more detail, keeping conversations intact and uninterrupted without adding clutter to a channel or direct message (DM) conversation. Threads appear in the as “mini sidebar” conversations in a channel on the right-hand side.
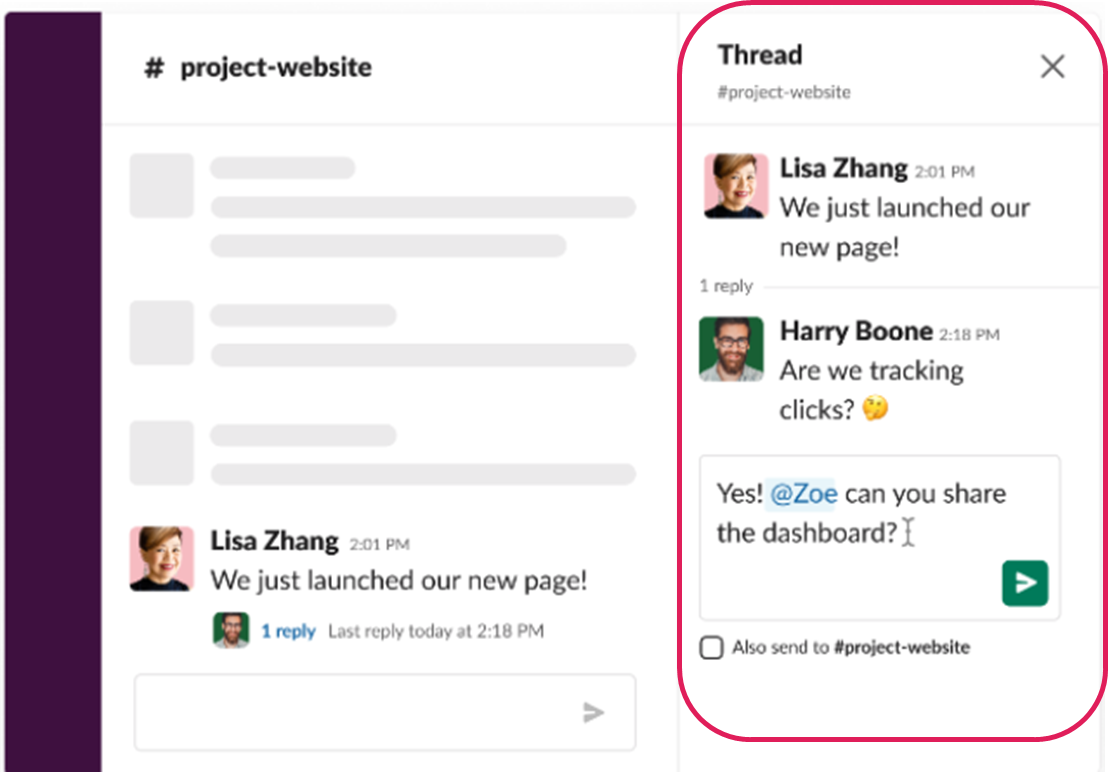
How?
Start a thread from any message whether in a channel or DM.
1. Hover over the message to which you'd like to reply.
2. Click the Reply in thread conversation bubble icon.

3. Type your reply and send your message.
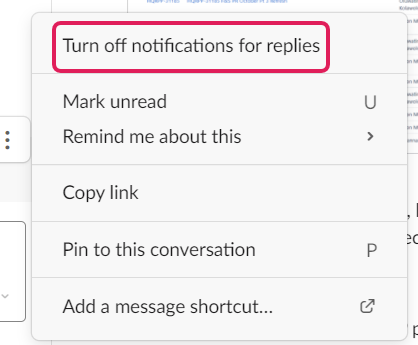
You’ll be notified of new replies to a thread if you started a thread, replied to a thread, or were mentioned in the original message or any thread replies.
For a thread you haven’t engaged with, you can choose to follow it to stay in the loop.
1. Hover over the thread.
2. Click the three dots icon.
3. Select Get notified about new replies to receive notifications for all new thread replies, or Turn off notifications for replies to stop receiving notifications.

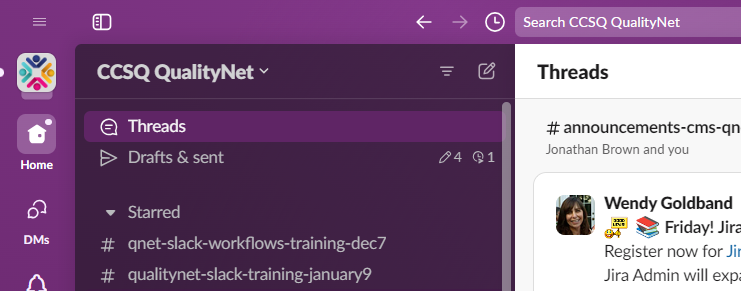
See all conversations you’re following:
Select Threads at the top of your left sidebar. Threads with unread replies will appear at the top of the list.
Bonus Tip!
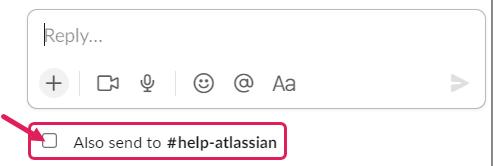
When others would benefit from seeing your thread reply, you can send your reply back to the channel or DM’s main view. Simply check the also send to #channelname box below your message before sending it.
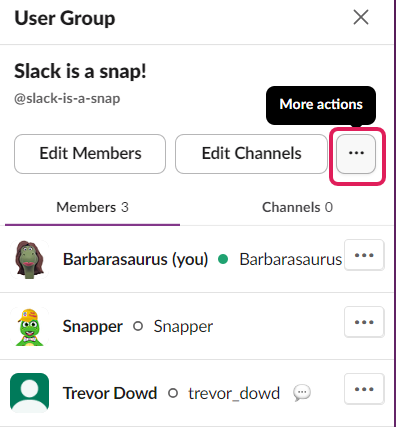
User groups are a great way to communicate with multiple members in a channel at once. Rather than having to continually search and type each individual’s name, give your group a name and the next time you want to get the attention of these same individuals, all you need to do is fill in the name of the user group!
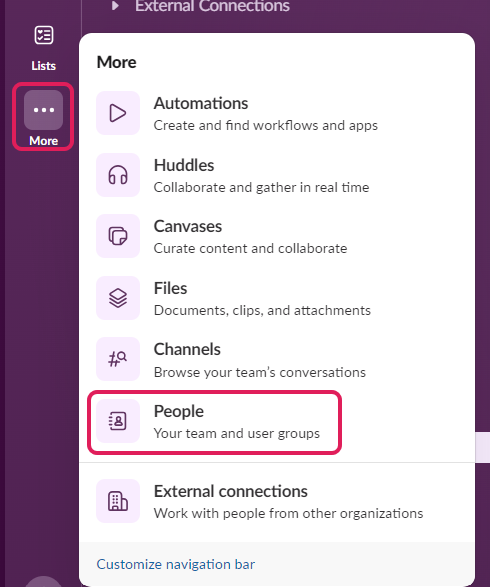
- From your desktop, click More, then select People.
- Click User Groups on the left side of the window.
- Click Create User Group in the top right. Choose a name and handle for your user group.
- Click Next.
- Under Add members, search for and select the members you’d like to add.
- When you’re done, click Create Group.
Watch the reboot of the QNet Chat 2024 on User Groups.
QualityNet Slack has a View Message Activity feature, available by request. It's a great feature that allows you to track the impact of your communications. Here’s what you can expect when using View Message Activity:
- View message activity for messages sent in the last 12 months in public channels with at least 50 members
- Owners, admins, and members with permission can see how many people have interacted with a given message.
-Measure impact of announcements and internal communications.
- View message data from the channel where the message was posted.
-See message views, reactions, clicks, and shares on a message.
Gaining Access
To gain access to the View Message Activity feature, anyone on your team can make a request to #help-slack. Once your request is made, you’ll be set to go.
Steps
- Hover over a message and click the three dots icon.

2. Select View message activity.

3. If you'd like, click the date ranges under Activity over time to adjust the graph.
Message Activity Data
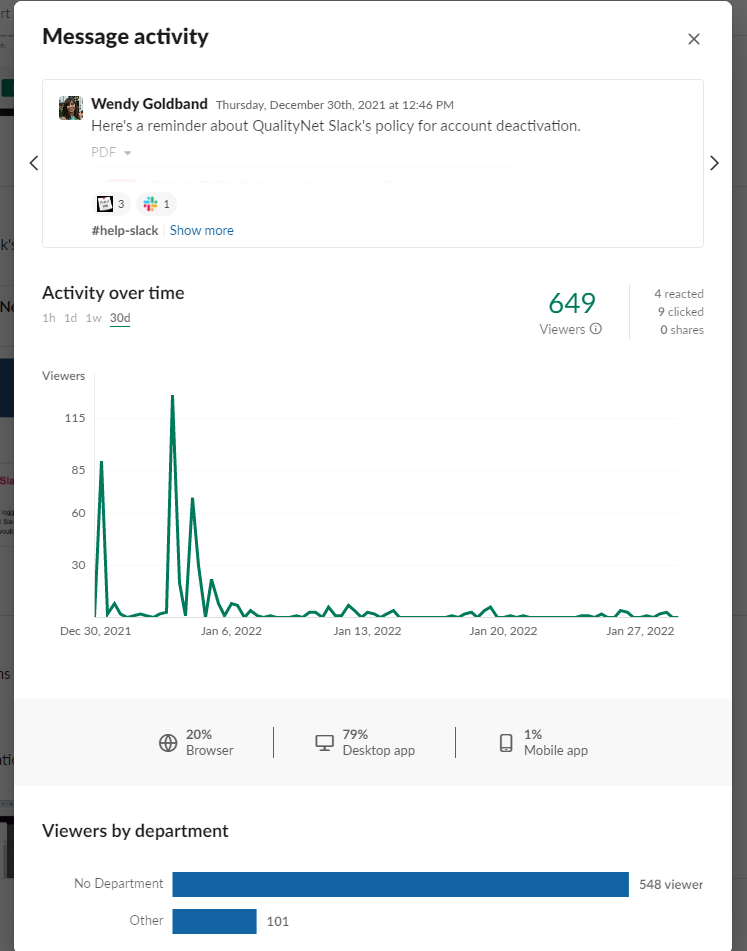
Data that you can collect with the Message Activity feature includes:
- Activity stats - number of members who have viewed, reacted to, or clicked a message, and the number of times a message was shared
- Graph - visual representation of message views over time
- Device summary - percentage breakdown of where members first viewed the message: in a browser, in the Slack desktop app, or in the Slack mobile apps
- Top Replies - preview of message’s threaded replies with the most reactions
- only visible when the message has at least one reply
*Note
Only activity for messages that have been sent in the last 12 months in public channels with at least 50 members can be viewed. Message activity is not available for messages in Slack Connect channels or private channels.

Quickly and easily find recent conversations in QualityNet Slack in the new Drafts & sent section. Once in the section, you can view all your drafts, scheduled messages, and sent messages.
Here’s how:
1. Login to the Drafts & sent section located near the top of the left-hand navigation panel.

2. Click on the corresponding tabs for Drafts, Scheduled, and Sent to view the contents. Drafts and Scheduled tabs will display a number indicating how many messages are contained in their folders. The Sent folder will contain all messages you’ve sent in your history.

Tip! You can send messages in real time, or schedule them to send later. If you start writing a message and don’t send it, it’ll automatically save as a draft.
Press Enter to send your message. Or click the down arrow icon (next to the paper plane icon) to schedule it for later.

Put your most important QualityNet Slack contacts in a special VIP sidebar section. If you have people you frequently message in Slack or who are VIPs whose messages can't be missed, then create a designated VIP section! Your VIP list can have up to 300 QualityNet Slack users. When your VIP sends a message to you or to a channel, you can easily find it in your VIP section at the top of your sidebar. You can also filter those messages in the Activity tab. Notifications from VIPs can even come through when you’ve set a Do Not Disturb mode.
Steps to Create a VIP Section:
There are 2 ways to create your VIP section and add VIPs. The first is:
1. Click your profile picture in the sidebar.
2. Select Preferences.
3. Click VIP list.
4. Search for and select the member you’d like to add.

Alternatively, if someone is already in your DM list:
1. Right-click on the person’s name.
2. Select Add to VIP.

Once you’ve selected your first VIP, the VIP section will appear towards the top of your channel list.
To remove a member from your VIP list, click Remove.
Conversations in Slack can be popped outside of the main Slack window for easier multi-tasking. In other words, channels, Direct Messages (DMs), Threads, Mentions & reactions, Unreads, and stand-alone Canvases open in a new window allowing you to have multiple windows open for viewing.

More than 2 Views
Windowing provides the ability to move seamlessly between many different views, whereas Split View was limited to only two views. Plus, by opening a surface in a new window, you now can control the size of the window, can minimize the window, and can leave windows open for as long as you want.
Steps to Pop Out Windows
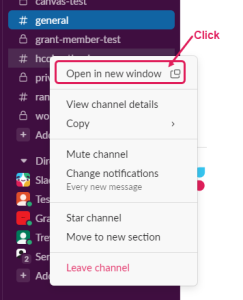
To open channels or DM conversations in new windows:
- Right-click on the item.
- Select Open in new window.
3. Move and size the window by placing your cursor over the top border and customize to your liking.
To open a Thread in a new window:
- Click on the Thread and it opens in the right sidebar.
- Click on the window icon on the top right.
![]()
3. The window pops out, and you can now close the right sidebar.
To open a Canvas in a new window:
- Click the Canvas icon in the upper right corner of the channel or DM.
![]()
2. Click the 3 ellipses.
3. Select Open in New Window to pop out the Canvas.

The Workflow Builder has been updated. Watch our presentation to learn all about the new design changes.
Learn more! Head to our Resources tab and download our Workflows training slides and training recordings. Or register for an upcoming Workflows 201 interactive training.
You can customize the look of your QualityNet Slack workspace.
- Click your profile on the right side of the upper border.
- Click on Preferences.
- Click on Themes.
Switch from Light to Dark background and choose different Slack themes colors. Or create a Custom Theme, where you can even pick "Surprise me".
The following are important concepts to understand when exploring QualityNet Slack.
Workspaces | A Slack workspace maps to an organization or a department—think of it as an office building that you need to be invited into. The Slack desktop and mobile apps allow you to log into multiple workspaces at once. |
Channels | Channels are like large conference rooms or offices inside the office building, and can be created for any project, topic, or team. Channels can be public, meaning anyone in the workspace can read or join, or private. Channel names always start with a # (pound sign or hashtag). |
Direct Messages | Direct messages (also known as DMs) are smaller conversations in Slack that happen outside of channels. DMs work well for one-off conversations that don’t require an entire channel of people to weigh in, like if you wanted to ask a teammate to reschedule a meeting. You can DM a single person, or several people at once. |
Conversations | Channels and direct messages are structured similarly in Slack. We refer to them jointly as conversations. |
Threads | Threads help you create organized discussions around specific messages within a conversation. |
Mentions | Mentions are a direct way to notify people of something that needs their attention in Slack. They start with an @ (at symbol). |
Reactions | An emoji reaction can be attached to a message to replace the need for a follow-up message. You can add multiple emoji reactions to a message. |
Get a quick understanding of QualityNet Slack in this downloadable document.
ACCESSING QUALITYNET SLACK
CCSQ QualityNet Slack is located at: https://hcqis.slack.com. Use your HARP credentials to login.
Don't have your HARP credentials?
HCQIS Access Roles and Profile (HARP) is CCSQ's secure identity management portal. You will need to create a HARP account in order to request access to CCSQ QualityNet Slack or any other QualityNet IT Services.
Watch this video to learn how to gain QualityNet Slack access in four easy steps.
**Please note that the label in the top-left corner of QualityNet Slack will now say CCSQ QualityNet.
Steps to Access CCSQ QualityNet Slack
Step 1: Register for a HARP ID. For instructions on the process or for more information about HARP, please refer to the HARP page.
*Note: After your first login to HARP using your EUA credentials it will activate the PIV login feature for future use. If you are having trouble with utilizing PIV to log in, please sign in using your EUA. If you have any issues logging into HARP with your EUA credentials, please contact the Service Center at (866) 288-8914.
Step 2: Once the HARP account has been created, login to HARP and request a QualityNet Slack user role. Follow the instructions below for requesting a Slack User Role to submit this request. Here's what to do if you don't see your organization listed.
*Note, your organization needs to have a Security Official identified before users can join.
Step 3: When the organization's Security Official approves the user role request you will receive a confirmation email.
Step 4: Now you're ready to access CCSQ QualityNet Slack via https://hcqis.slack.com using your EUA User ID and Password!
Once you have created your HARP account (for instructions on the process, refer to the HARP page), or if you have an EIDM account, the next step is to request the CCSQ QualityNet Slack User role. Expand the steps below to view the process.
Go to https://harp.cms.gov/ and login to your HARP account.


Once your role has been approved by your SO, you will then have access to CCSQ QualityNet Slack.
Each organization needs to designate a Security Official (SO) who will be responsible for approving individuals for access to CCSQ QualityNet Slack within their organization. Below are the steps for requesting to be assigned as an SO. The submitted request will be sent to the Master Slack SO for approval. Once the request is approved, the organization SO will have full access to approve members of your organization for access to Slack.
Once you have created your HARP account (For instructions on the process, refer to the HARP page), or if you have an EIDM account, the next step is to request the QualityNet SLACK SO role. Expand the steps below to view the process.
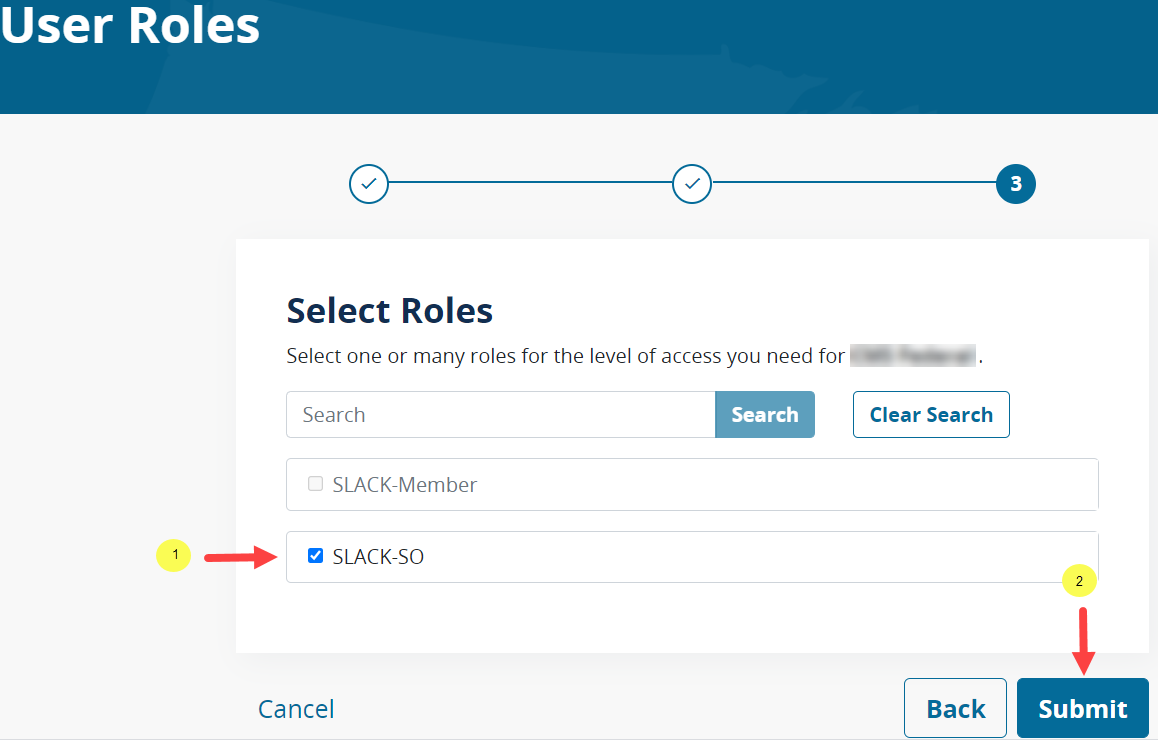
Once your role has been approved, you will then have access to approve the members of your organization for access to CCSQ QualityNet Slack.
To install a desktop version of Slack on CMS laptops, please call or submit an email request to the CMS IT Service Desk to install the software.
E-mail: CMS_IT_SERVICE_DESK@cms.hhs.gov
Phone: 410-786-2580 or 1-800-562-1963
Download Slack for free for mobile devices and desktop. Keep up with the conversation with Slack apps for iOS, Android, Mac, Windows and Linux.
From your mobile device (GFE and CFE Devices ONLY):
To download Slack on your phone (GFE and CFE Devices ONLY), find it at your app store and follow the steps. Or click from here:
- Tap Install.
- Tap the Slack icon to launch the app.
- Select "Sign In" and then select the "Sign In with URL" option.
- Type hcqis.slack.com as the workspace Url (note .slack.com will be typed for you).
- Select Sign in with HARP ID and sign into your Harp account.
- Press the open with Slack button after signing in.
- Note: Having trouble downloading or running Slack? See if your device meets the technical requirements for Slack apps.
Get to Know QualityNet Slack
*Please note that the QualityNet Slack workspace is now called CCSQ QualityNet. That is the workspace name you will see in the upper left-hand corner of your Slack screen.
Basic Slack Navigation
Resources For Getting Started
- Important Slack Concepts
- Slack Beginners Guide - Great tool for learning your way around Slack
- Slack Basic Navigation
- An Introduction to the New Slack Interface Design - December 2023
- CCSQ QualityNet Slack Channel Naming Guide
- Slack Etiquette Guide
- Slack Quick Reference Guide
- Slack CMS YouTube Playlist - Access our CCSQ QualityNet Slack videos
More In-Depth Resources
Training Slides & Recordings
Recordings
- Slack 101 Essentials Training Recording 1-26-2022
- Slack 101 Essentials Training Recording 3-4-2022
- Slack 101 Essentials Training Recording 5-20-2022
- Slack 101 Essentials Training Recording 6-8-2022
- Slack Corporate 101 Training Video Recording
- Slack Corporate 101 Training PPT - Download and watch in presentation mode
Workflows QNet Chat Reboots -
#Channels to Join
- #help-slack - Get quick info, tips, tricks for using SLACK
- #announcements-cms-qnet - General announcements for the entire community
- #slack_apps - A reference library with listings and descriptions for all QualityNet Slack app integrations
- Slackbot - Ask the Slack bot a question
Slack 508 Accessibility
Tools Chat Reboots
- Slack Workflows
- Barbarasaurus Personal Interview
- Slack-Confluence Integration
- Barbarasauraus Presents: Discovering the New Slack Huddles Features
- Accessibility in Slack
- QualityNet Slack Canvas Jeopardy Show
- The New Workflow Builder
- The Slack Interface Design - Snapper Gives a Tour
- Canvas & Gif Picker – Listen in on a Huddle with Barbarasauraus and Snapper
- Slack Lists
- File Size
Support
Analytics
Get insight about your channels to increase functionality with data like:
- Where people send the most messages and files—private vs. public, channels vs. direct messages
- Total number of members and number of messages sent
- Number of weekly or daily active members
To access the Analytics Dashboard:
- Click on CCSQ Workspace dropdown.
- Select Tools.
- Select Analytics.

Security Guidelines
- CCSQ QualityNet Slack users must follow the HHS Rules of Behavior policies at all times.
- PHI/PII shall never be shared within Slack. If this occurs, a Security Incident should be opened immediately.
- CCSQ QualityNet Slack users shall be mindful of the type of content that is made publicly vs. within private channels.
- CCSQ QualityNet Slack is available on mobile devices. However, users should NOT download files on personal mobile devices as this may violate HCQIS Contractor Furnished Equipment (CFE) policies.
- ONLY CMS approved Slack application (plug-ins) will be made available. To request an application please follow #app-requests on your Slack Dashboard
FAQs
GENERAL | ACCESS | SLACK & ATLASSIAN
CCSQ QualityNet Slack is a digital based collaboration platform that allows you to connect with individuals as well as groups within the CCSQ Community using a variety of different methods including: Channels, Direct Messaging, Voice Calls, Screen Share, File Sharing and more. Learn more about Slack here.
Currently, CMS and all contractor users of pre-approved organizations in HARP can immediately request a user role.
There is the possibility to have shared channels between the CCSQ QualityNet and OIT instances of Slack in the future; however there are no channels shared at this time.
For instructions on how to register for a HARP account, visit the HARP page.
Register for a HARP ID. Once the HARP account has been created, login to HARP and request a QualityNet Slack account via a HARP User Role. For instructions on this process, visit the HARP page.
From your PC web browser:
- Browse to https://slack.com/downloads/windows
- Download, install, then enter "hcqis.slack.com" address and login with your HARP ID and password
![]() Slack
Slack
Windows | Downloads
Download Slack for free for mobile devices and desktop. Keep up with the conversation with Slack apps for iOS, Android, Mac, Windows and Linux.
From your mobile device (GFE and CFE Devices ONLY):
To download Slack on your phone (GFE and CFE Devices ONLY), find it at your app store and follow the steps. Or click from here -
- Tap Install.
- Tap the Slack icon to launch the app.
- Select "Sign In with Workspace URL" and then select the "Sign In with saml" option.
- Type hcqis.slack.com as the workspace Url (note .slack.com will be typed for you).
- Select Sign in with HARP ID and sign into your Harp account.
- Press the open with Slack button after signing in.
Note: Having trouble downloading or running Slack? See if your device meets the technical requirements for Slack apps.
CCSQ QualityNetSlack is currently integrated with CCSQ QualityNet Jira Server only. To request more info please contact the #help-slack channel or create a ticket in the QNASK Jira project.
Register for QualityNet Slack hands-on, interactive training sessions at QualityNet University. Trainings include Slack 101 Essentials, Slack Huddles, Slack Workflows, and Accessibility in Slack. Also visit the University for on-demand micro learning videos.

Click to download and help you navigate through Slack. Learn even more when you visit our Resources tab.
Do NOT Access QualityNet Resources from Outside the United States (US)
This notice is a reminder that contractual requirements and security policy prohibit this QualityNet Slack and other QualityNet Resources access from outside the U.S.
When access from outside the U.S. is detected, the user’s HARP roles will be removed (i.e., access will be disabled) until the investigation is complete and the user returns to the U.S.
It is recommended that you remove the Slack app from your phone if you are traveling abroad and reinstall it after you return to the U.S. If this is not feasible, you must log out of CCSQ Slack before you leave the U.S. and do not log in again until you return. Take these steps to ensure you are logged out from all devices:
- From your desktop, navigate to your Account settings by following this link: https://my.slack.com/account.
- Click Sign out all other sessions and follow the prompts.
Thank you for your attention and cooperation. If you have any questions, please reach out to your CMS Information System Security Officer (ISSO) or Contracting Officer’s Representative (COR).
Please note that Slack is neither a System of Record nor approved for sensitive information. What does this mean for you?
- You should not expect posts or documents shared in this workspace to be backed up.
- You should not share Personally Identifiable Information (PII) or Protected Health Information (PHI) in Slack.
- You should not share sensitive information such as IP addresses, CIDR information, login information, and all passwords
- Public channels, and media posted to those channels, are visible to all users. Sensitive data and media cannot be shared in these channels.
Please note that Slack is for professional use only. What does this mean for you?
- You should not post harassing, offensive, or inappropriate messages related to race, color, religion, national origin, sex (including pregnancy, sexual orientation, and gender identity and expression), age, disability (physical or mental), genetic information, retaliation, veteran status, parental status, political affiliation, physical appearance, body size, or any other characteristic covered by the Agency's Equal Employment Opportunity (EEO) and anti-harassment policies in Slack.
- You should use Slack to collaborate on business goals and to build community aligned with CMS' culture initiatives. All the guidance above applies to business and social use and should guide an individual's behavior with colleagues on this platform.
- You should adhere to the HHS Rules of Behavior when using Slack.
Questions? Contact ServiceCenterSOS@cms.hhs.gov.
For more information: (Confluence Link)
All the best,
The QualityNet Slack Team
Questions? Contact the QualityNet Service Center at:
Phone: (866) 288-8914 (TRS:711)
Slack: #help-service-center-sos
Email: ServiceCenterSOS@cms.hhs.gov
Hours of Operation: 24/7
- CCSQ Support Central: Provides you with multi-program support to submit a new ticket, and track the status of an existing case, incident, or request. No login required. CCSQ Support Central
- ServiceNow Service Portal: Intended only for CMS employees and contractors. The portal provides self-service options for internal customers to report Security Incidents, submit Service Requests for tools or services offered to the internal QualityNet community, report an Incident, provide Approvals, or access internal Knowledge Base articles. The portal enables internal customers to track the status of tickets and requires a login. https://cmsqualitysupport.servicenowservices.com/sp_ess
- Please contact us via #help-slack or create a ticket in the QNASK Jira project.
- No labels


